ACM COMPUTE Regional Event Documentation
Welcome to the official documentation for hosting an ACM COMPUTE Regional Event (CRE).
This guide will help you set up your event website using the ACM CRE template.
New to CREs? Learn what a COMPUTE Regional Event is.
Who is this for?
Students, faculty, and organisers setting up a COMPUTE Regional Event at their university.
What you’ll end up with
A website for your event that includes:
- Event schedule
- Speaker and organiser profiles
- Venue information
- Registration (via embedded form)
- Sponsor showcase
Time required
About 30 minutes for initial setup, then ongoing customisation as you add content.
Quick Links
- Setup - Get your site running locally
- Deployment - Publish your site
- Quick Reference - Find which file to edit
- Troubleshooting - Fix common issues
Setup
This guide walks through setting up the ACM CRE template on your computer, from creating the GitHub organisation through to running the site locally.
The screenshots and command output in this guide are all from macOS. If you are on Windows or Linux, see Setup on other platforms for the equivalent terminal and toolchain steps, then return here for the GitHub and project steps which are platform-independent.
Before you begin
You will need:
- GitHub account. Create one here if you don’t have one.
- Text editor. VS Code works well.
Step 1: Create a GitHub organisation
Hosting your event in a dedicated GitHub organisation gives you a cleaner URL and lets multiple organisers collaborate. Creating an organisation is free.
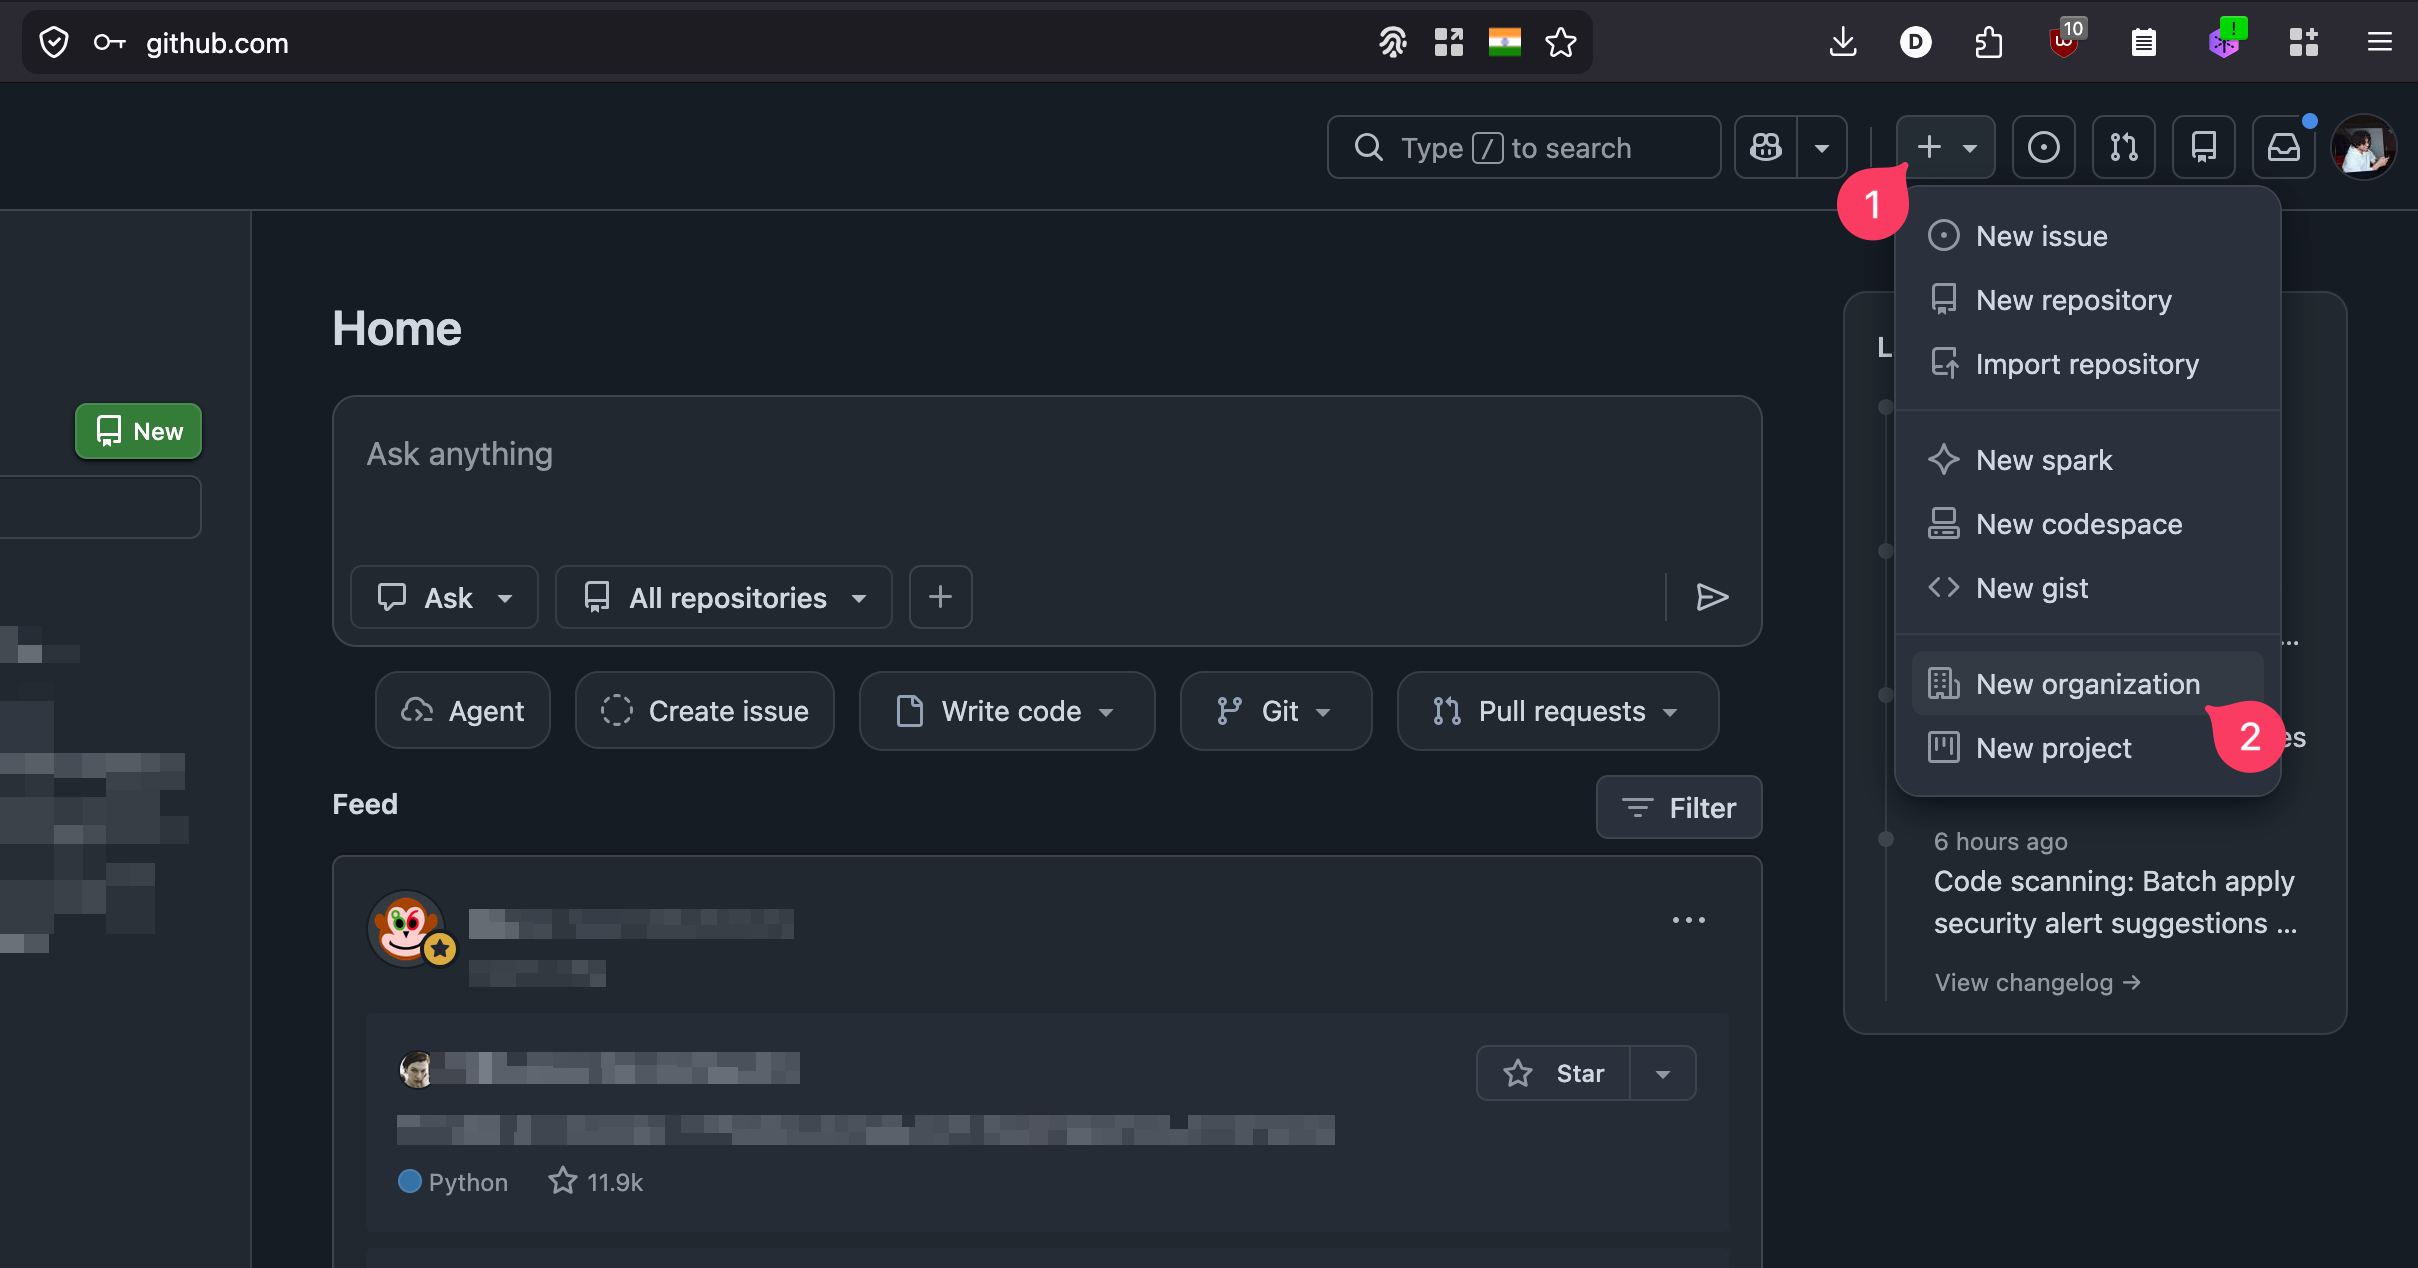
From the GitHub home page, click the + icon in the top-right toolbar, then choose New organization.
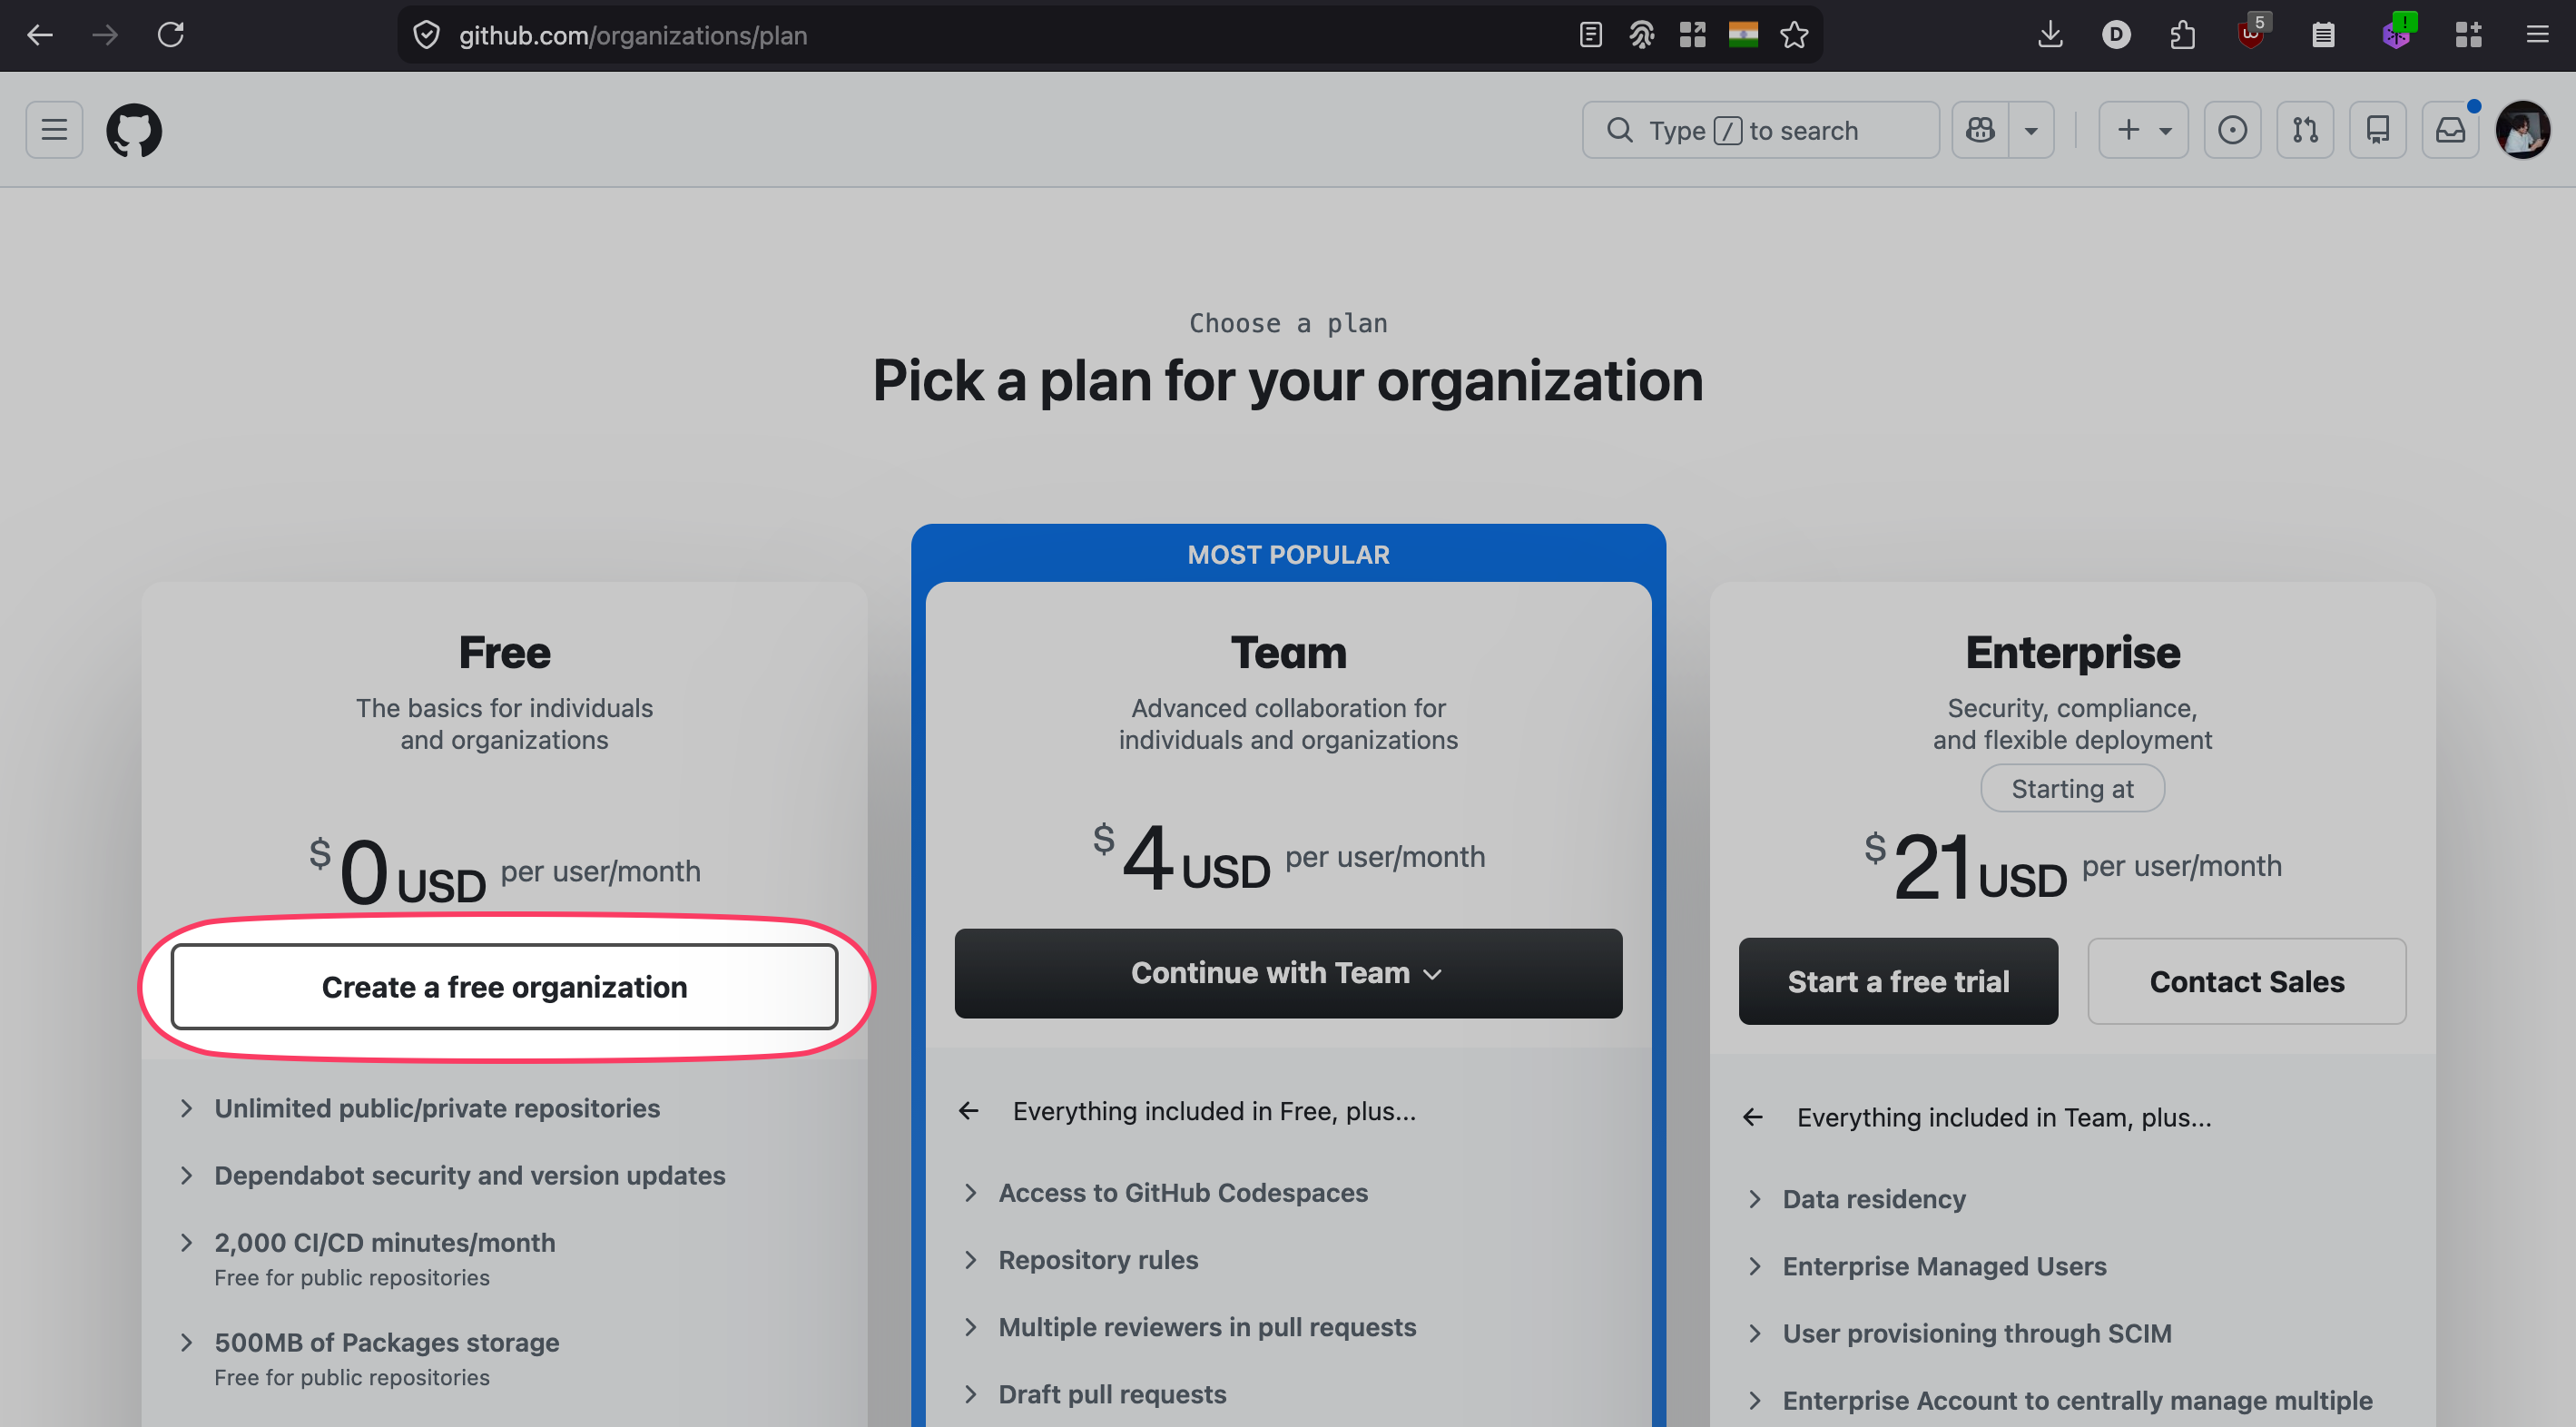
Pick the Free plan.
Fill in the organisation form:
- Organisation name (this becomes part of your URL, for example
acm-cre-ashoka) - Contact email
- Choose My personal account under “This organisation belongs to”
- Accept the Terms of Service
- Click Next

On the next screen you can invite collaborators or skip and click Complete setup.

For more details see GitHub’s guide on creating organisations.
Step 2: Create your repository from the template
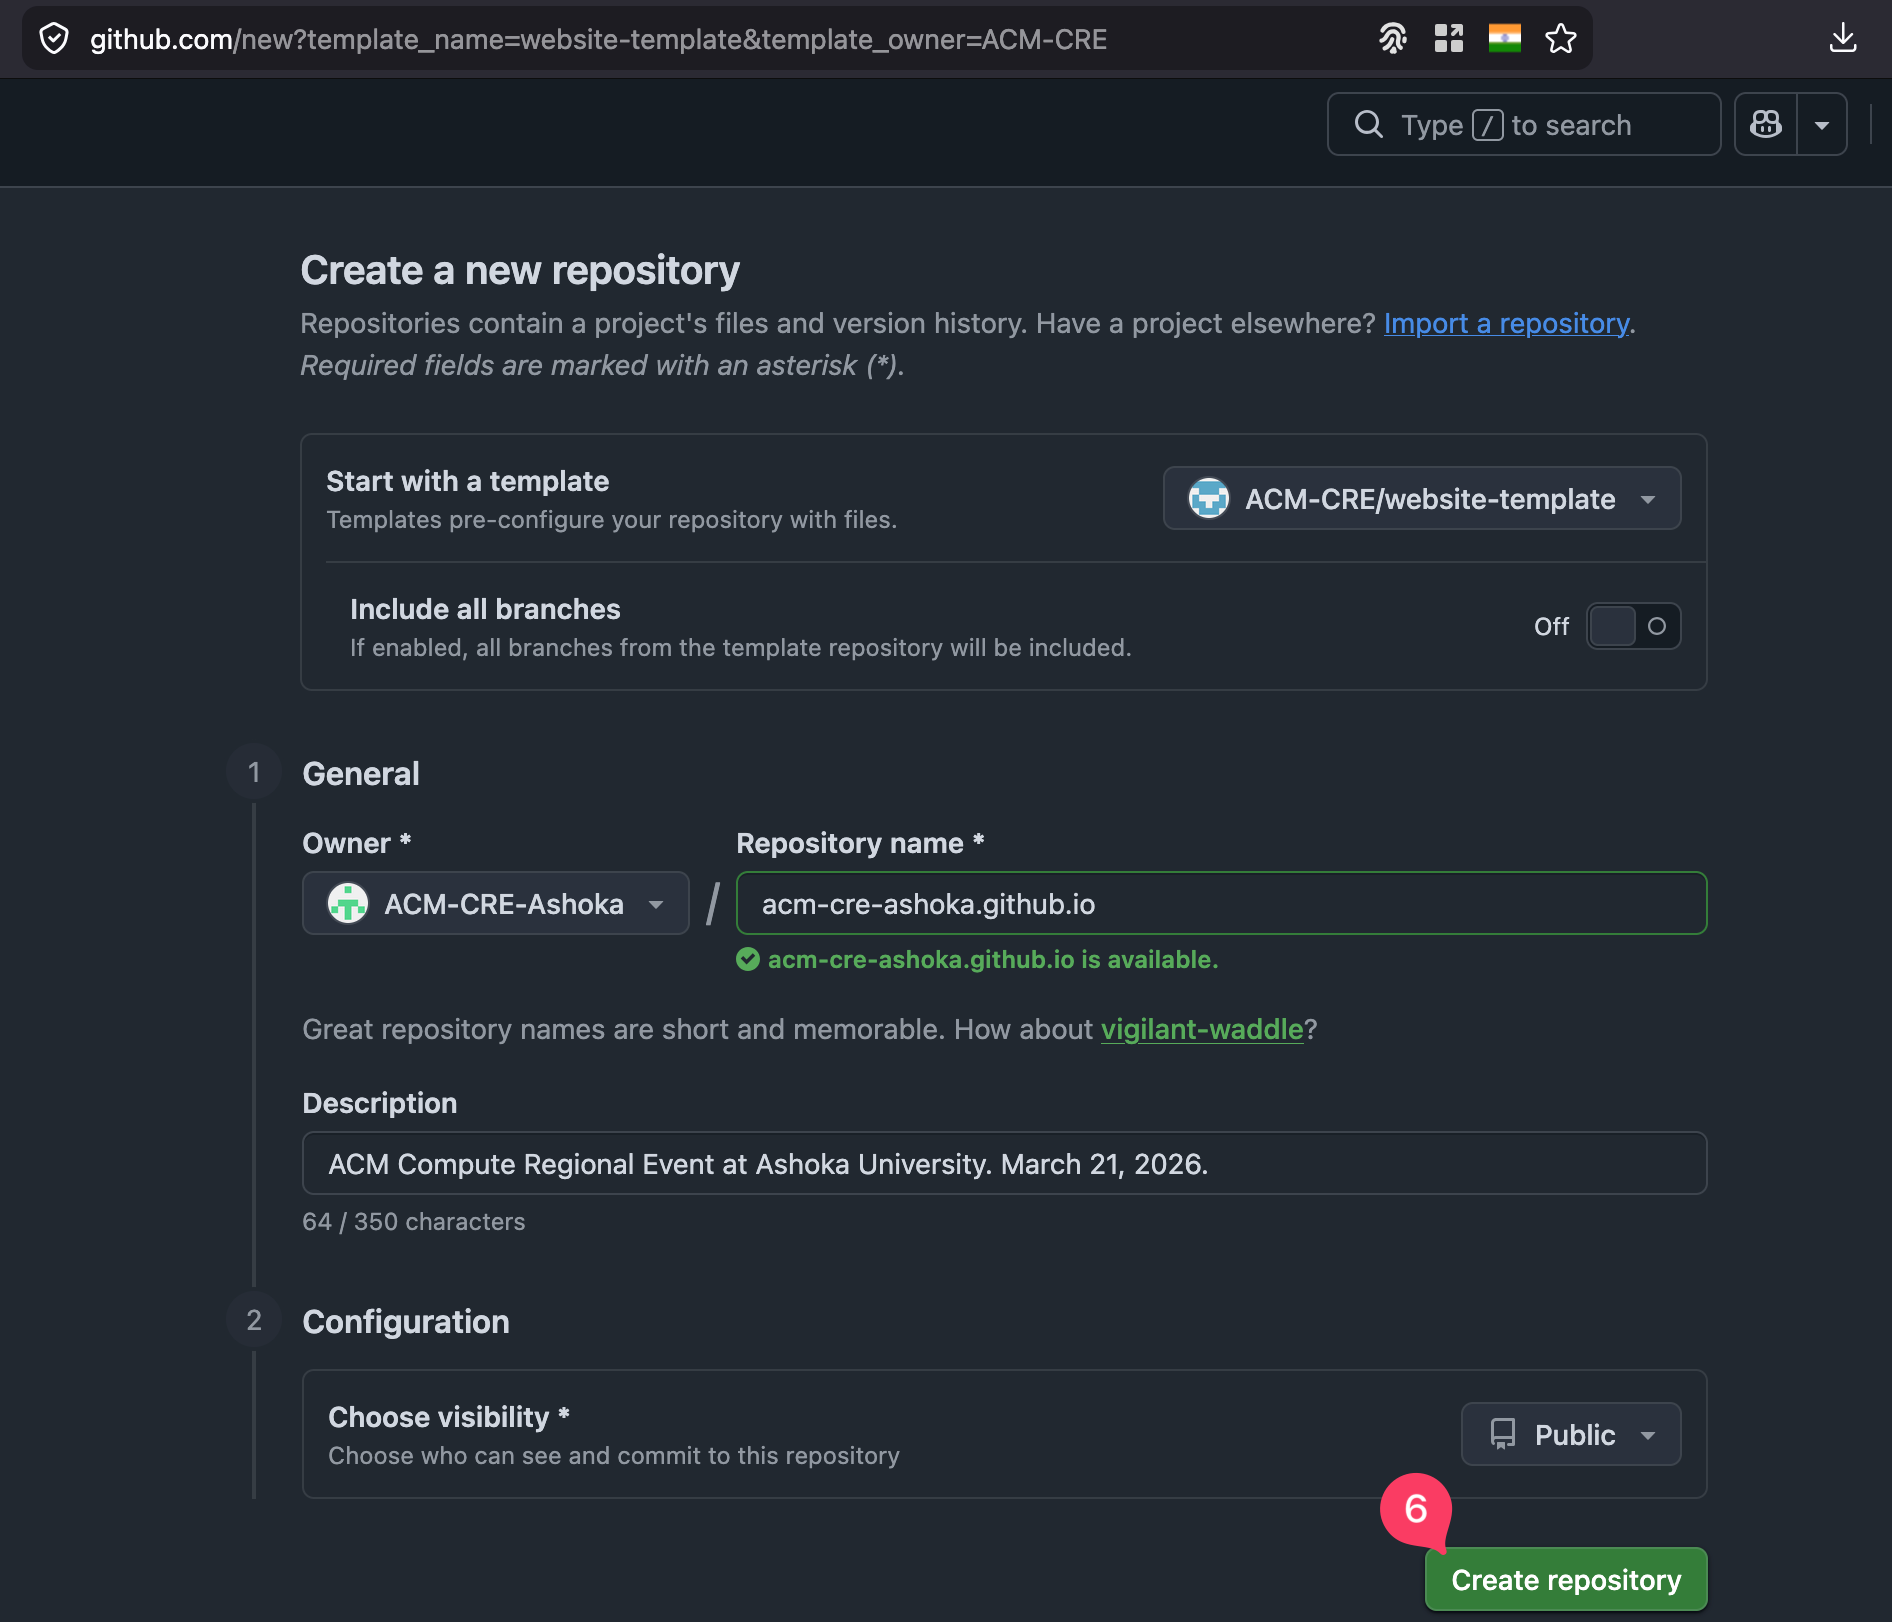
Go to github.com/ACM-CRE/website-template. Click Use this template and choose Create a new repository.

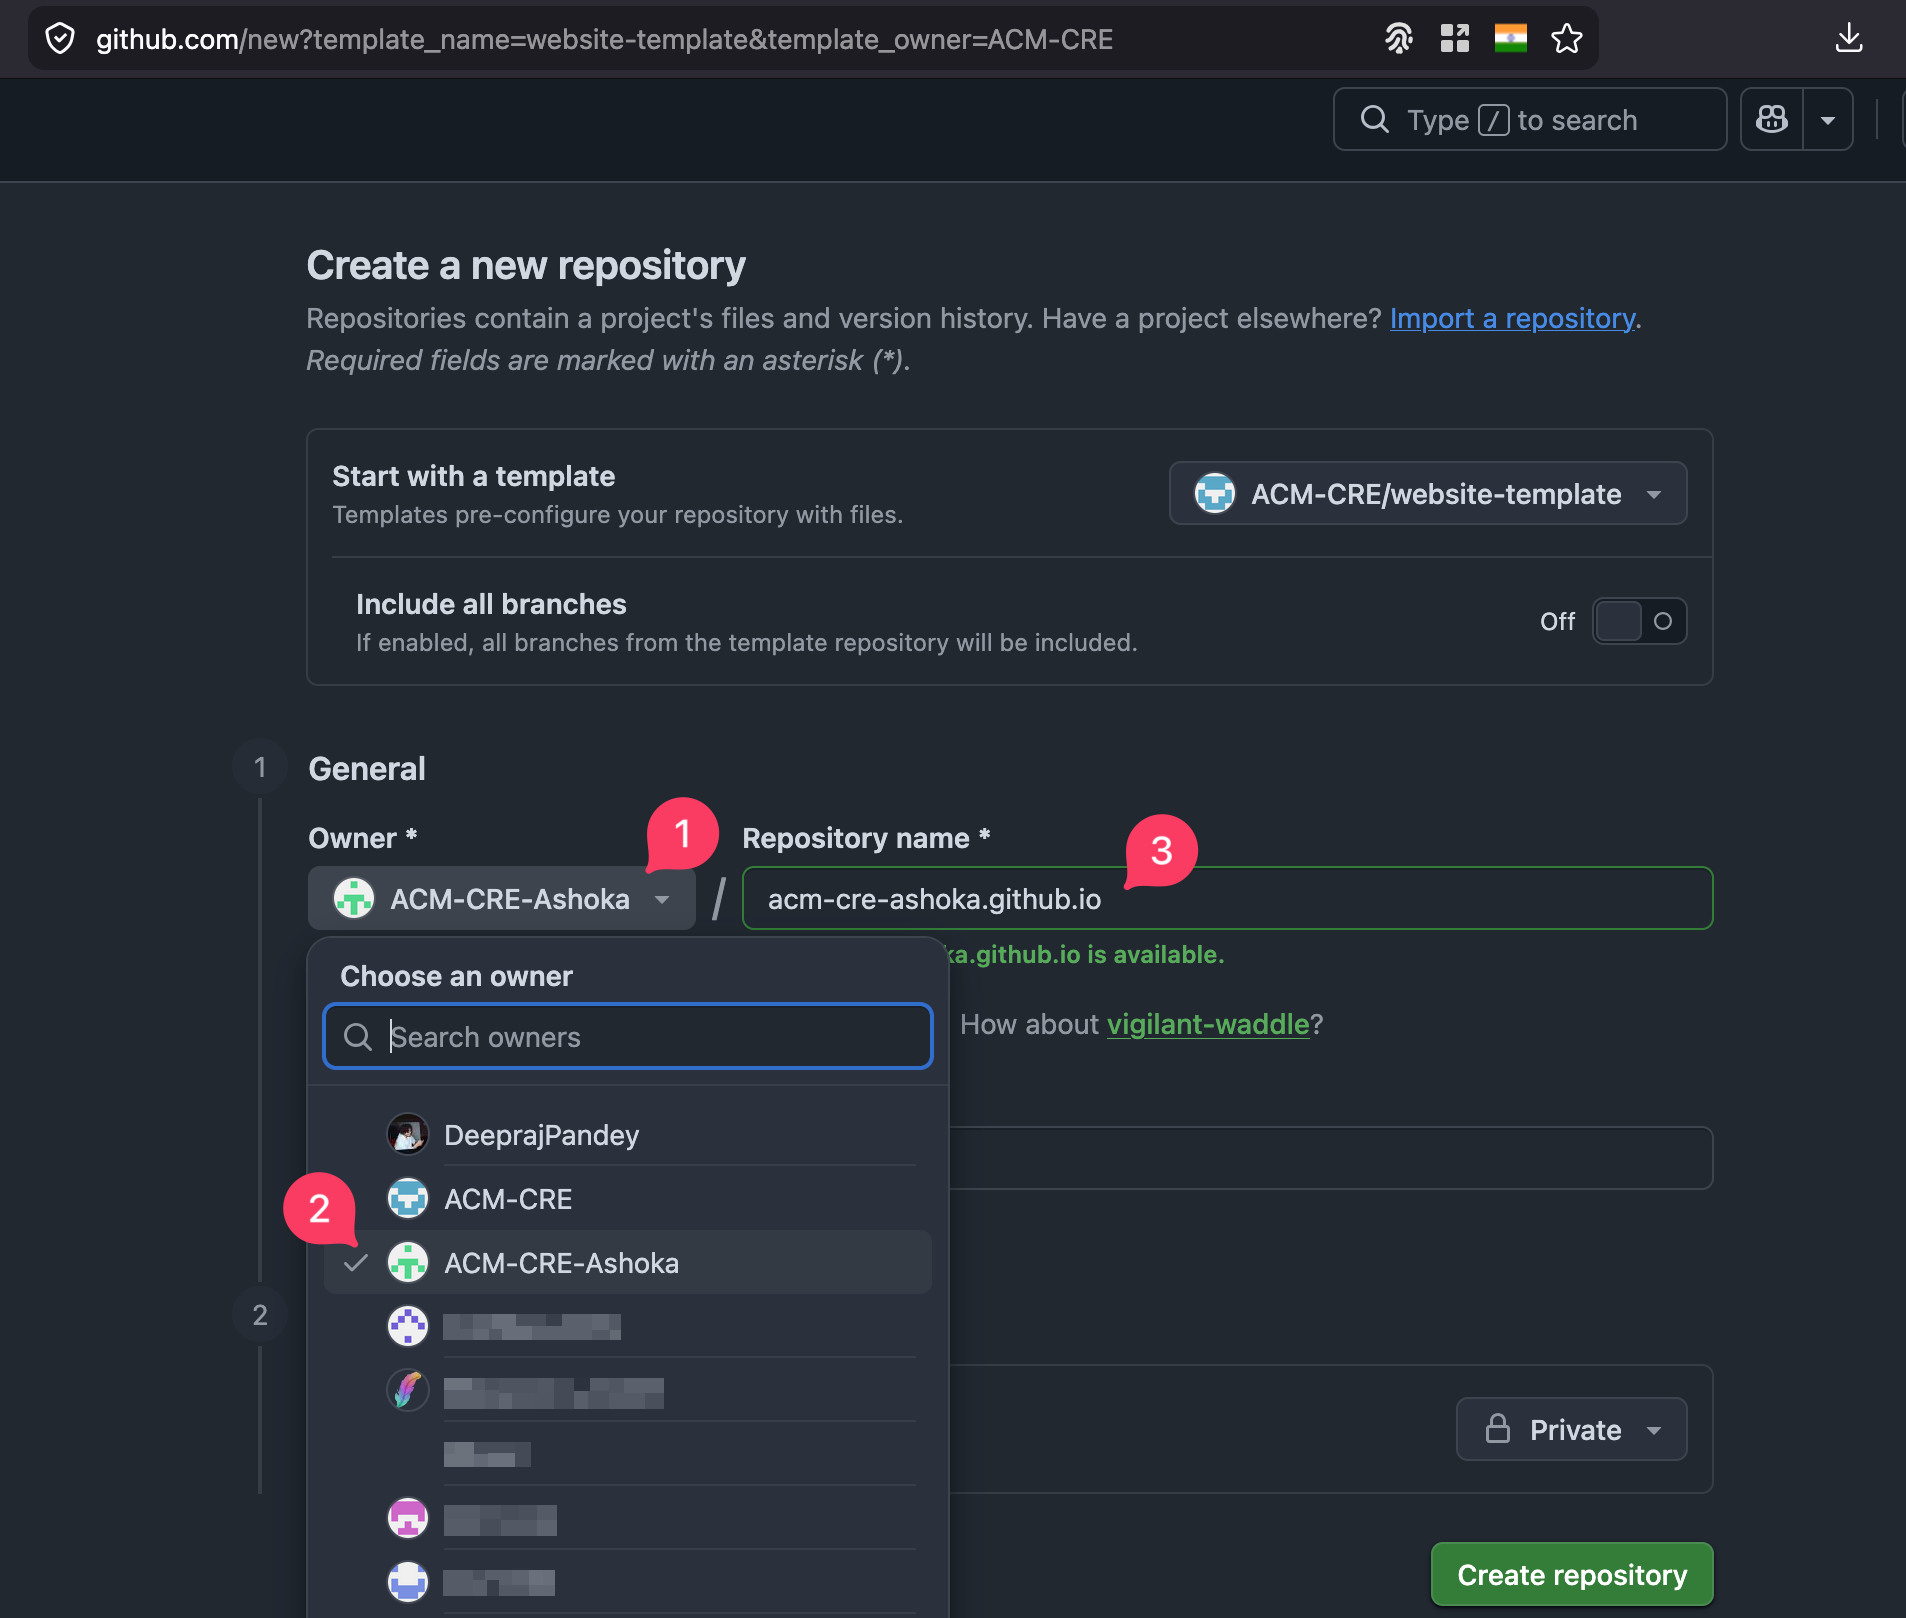
In the create-repository form:
- Open the Owner dropdown
- Pick the organisation you created in Step 1
- Set Repository name to
<your-org>.github.io(for exampleacm-cre-ashoka.github.io). Using this exact name means GitHub Pages will serve the site athttps://<your-org>.github.io/with no extra path. If you pick any other name, see Event Details → Site settings later for thebaseurladjustment you will need.
Add a short description, then check the visibility (4) and confirm Public (5).
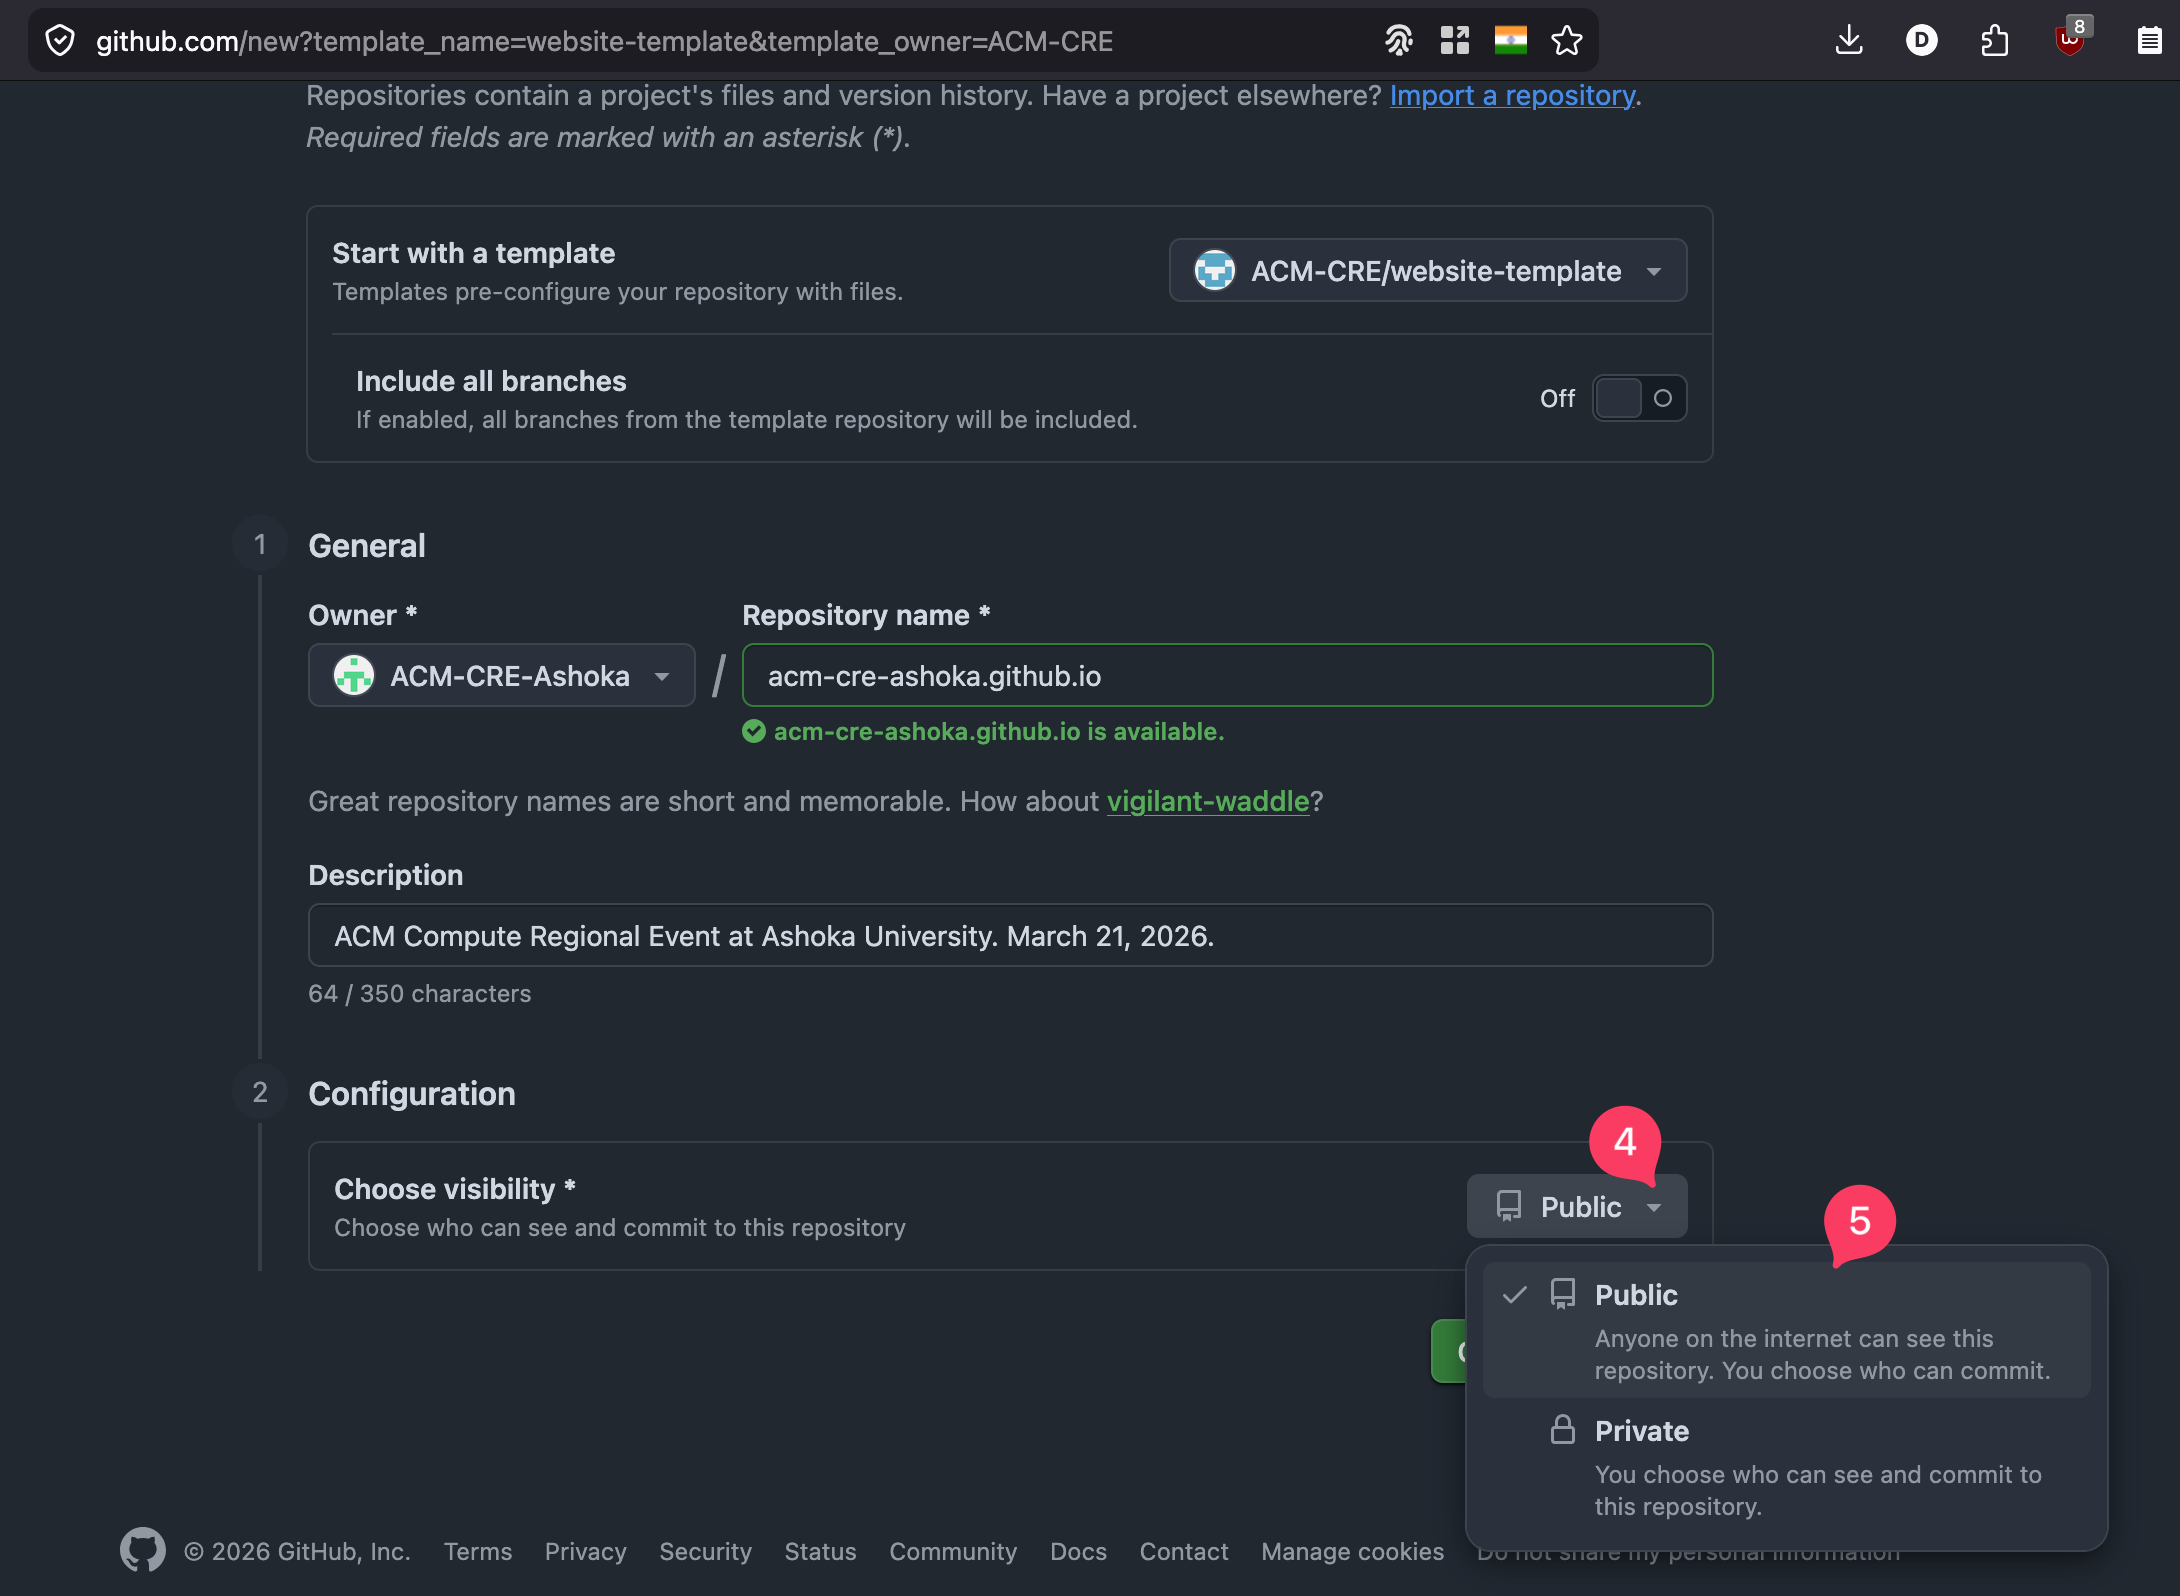
Click Create repository at the bottom.
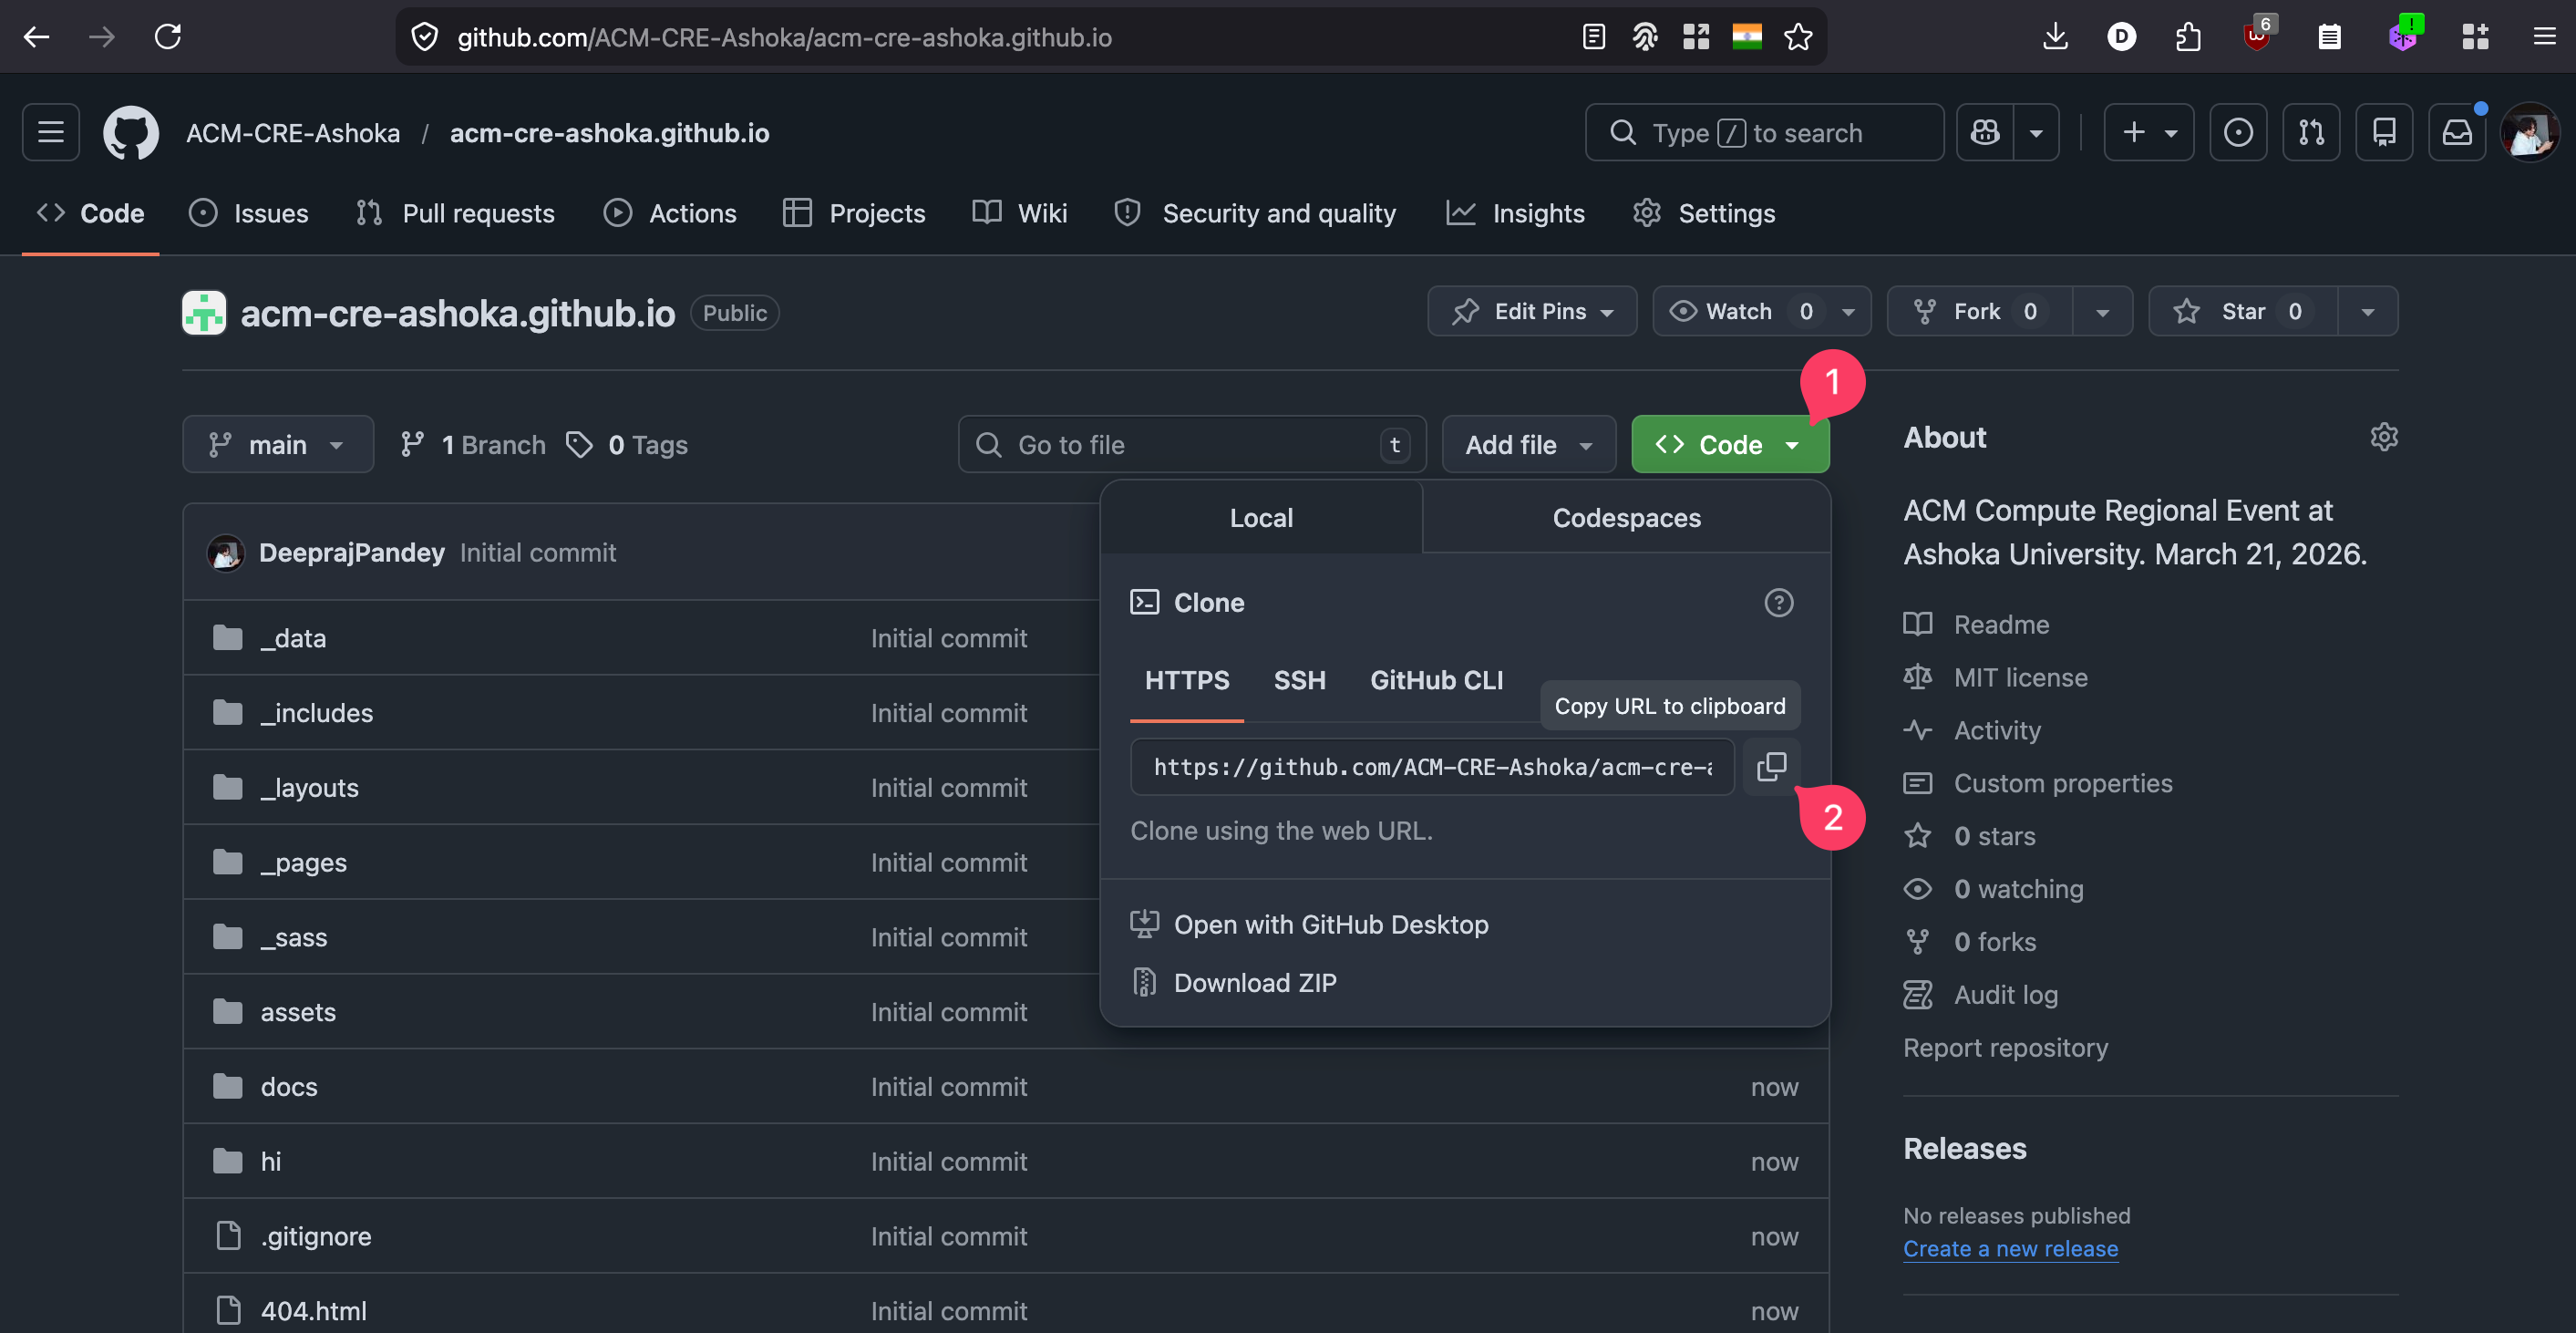
You now have your own copy of the template. Click the green Code button and copy the HTTPS clone URL. You will need it in Step 5.
For more details see GitHub’s guide on creating from a template.
Step 3: Open Terminal
Press Cmd + Space to open Spotlight, type terminal, and press Enter.
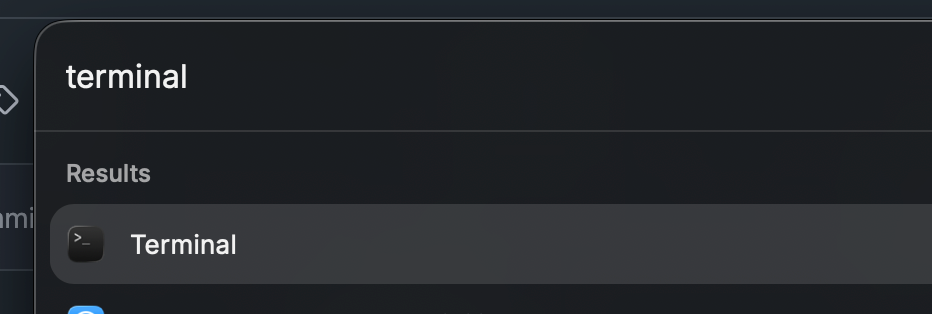
Leave Terminal open. The remaining steps all run inside it.
Step 4: Install the Xcode Command Line Tools
The Command Line Tools give you git, a C compiler, and the system headers that several Ruby gems need to build. On a fresh Mac you almost certainly do not have them yet.
Run:
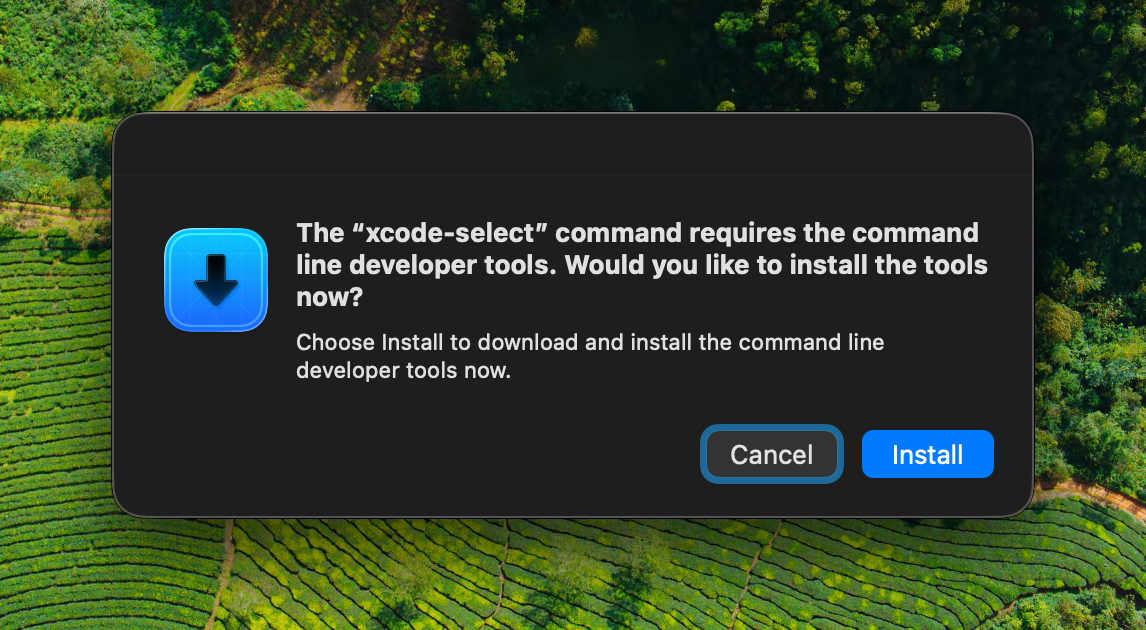
xcode-select --install
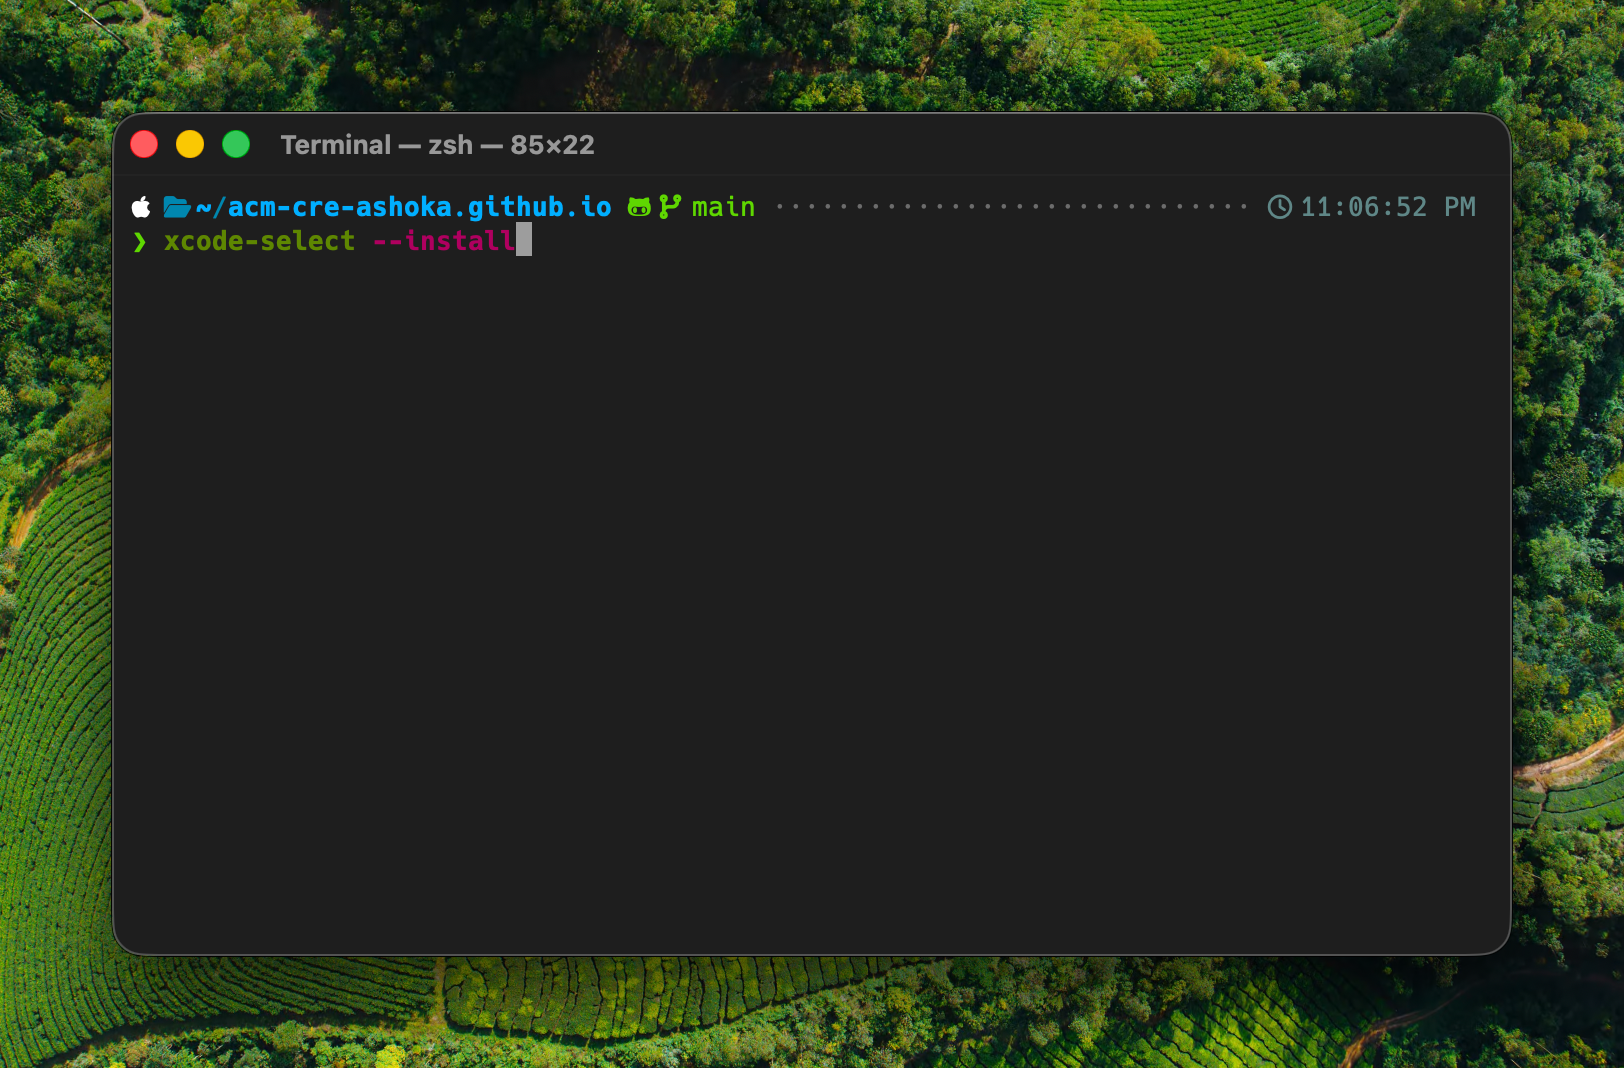
A system dialog appears. Click Install.
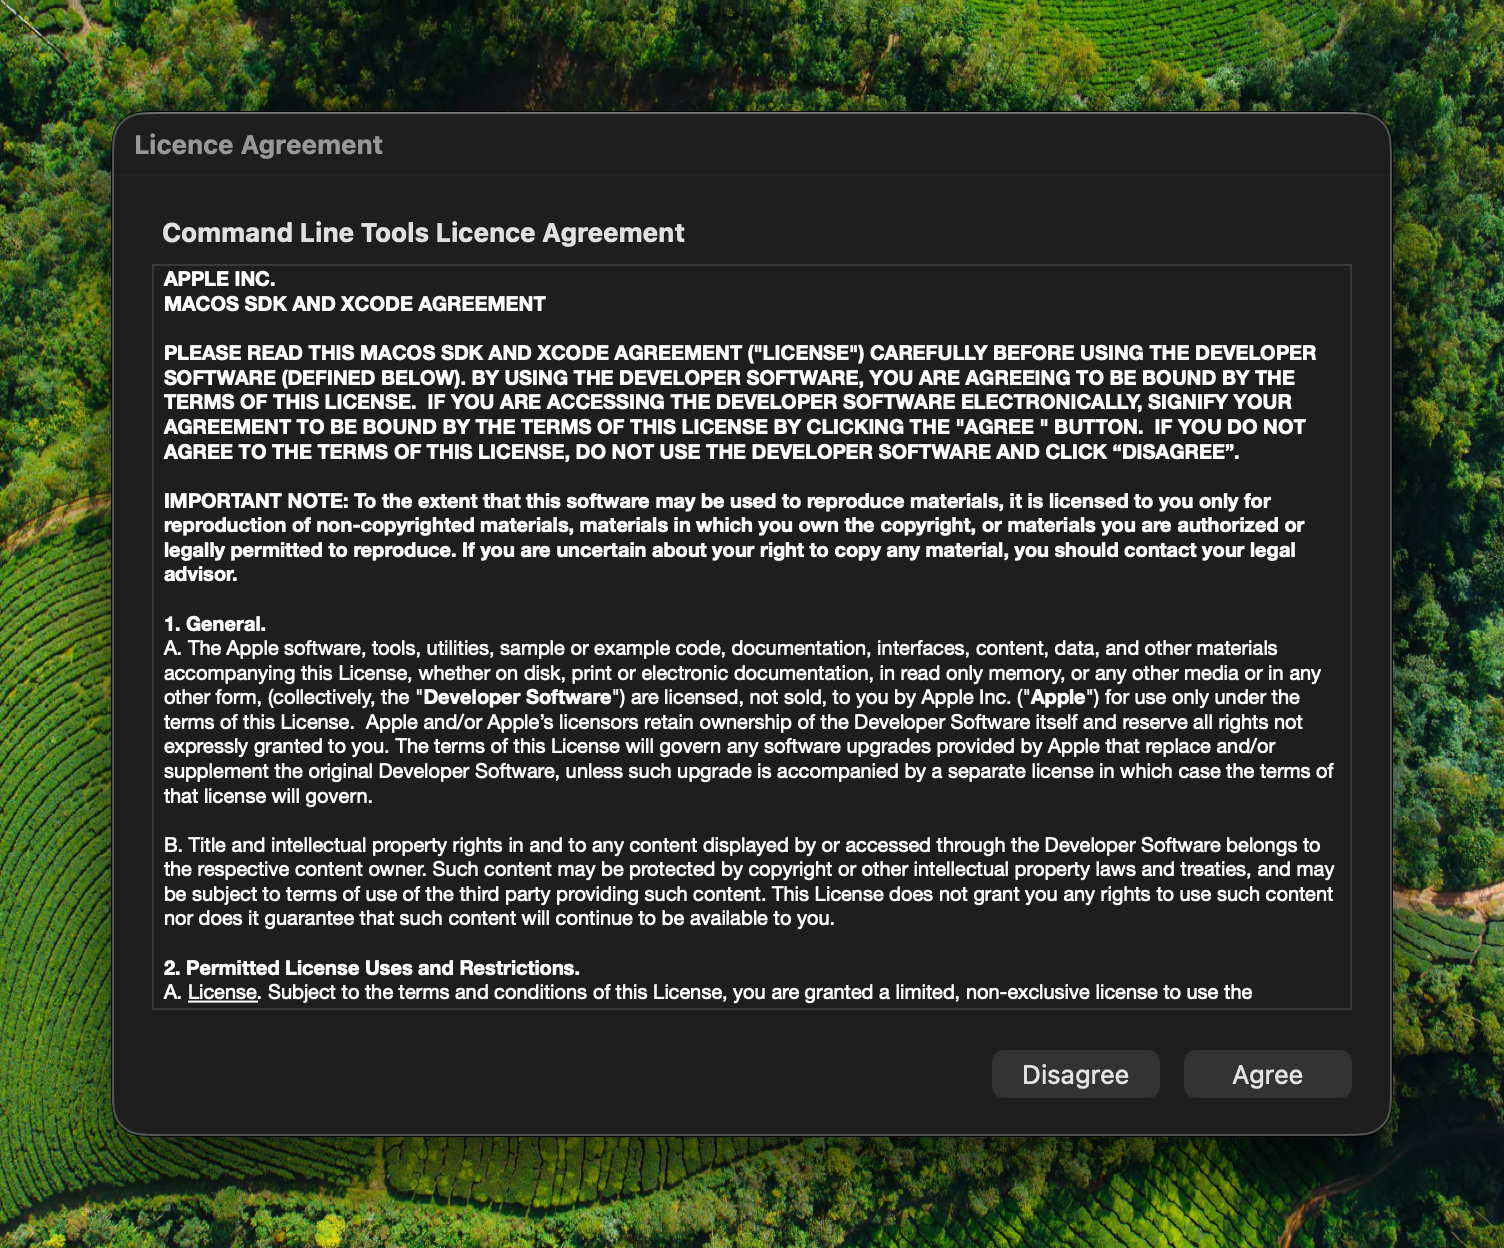
Accept the licence agreement to start the download.
Wait for the installer to finish. This can take several minutes depending on your connection.
If xcode-select --install fails
On older macOS versions you may see the error Xcode is not currently available from the software update server. In that case, download the installer manually:
- Go to developer.apple.com/download/all and sign in with your Apple ID.
- Find the Command Line Tools for Xcode release that matches your macOS version. The version must match (for example macOS 26.4 needs the 26.4 release).
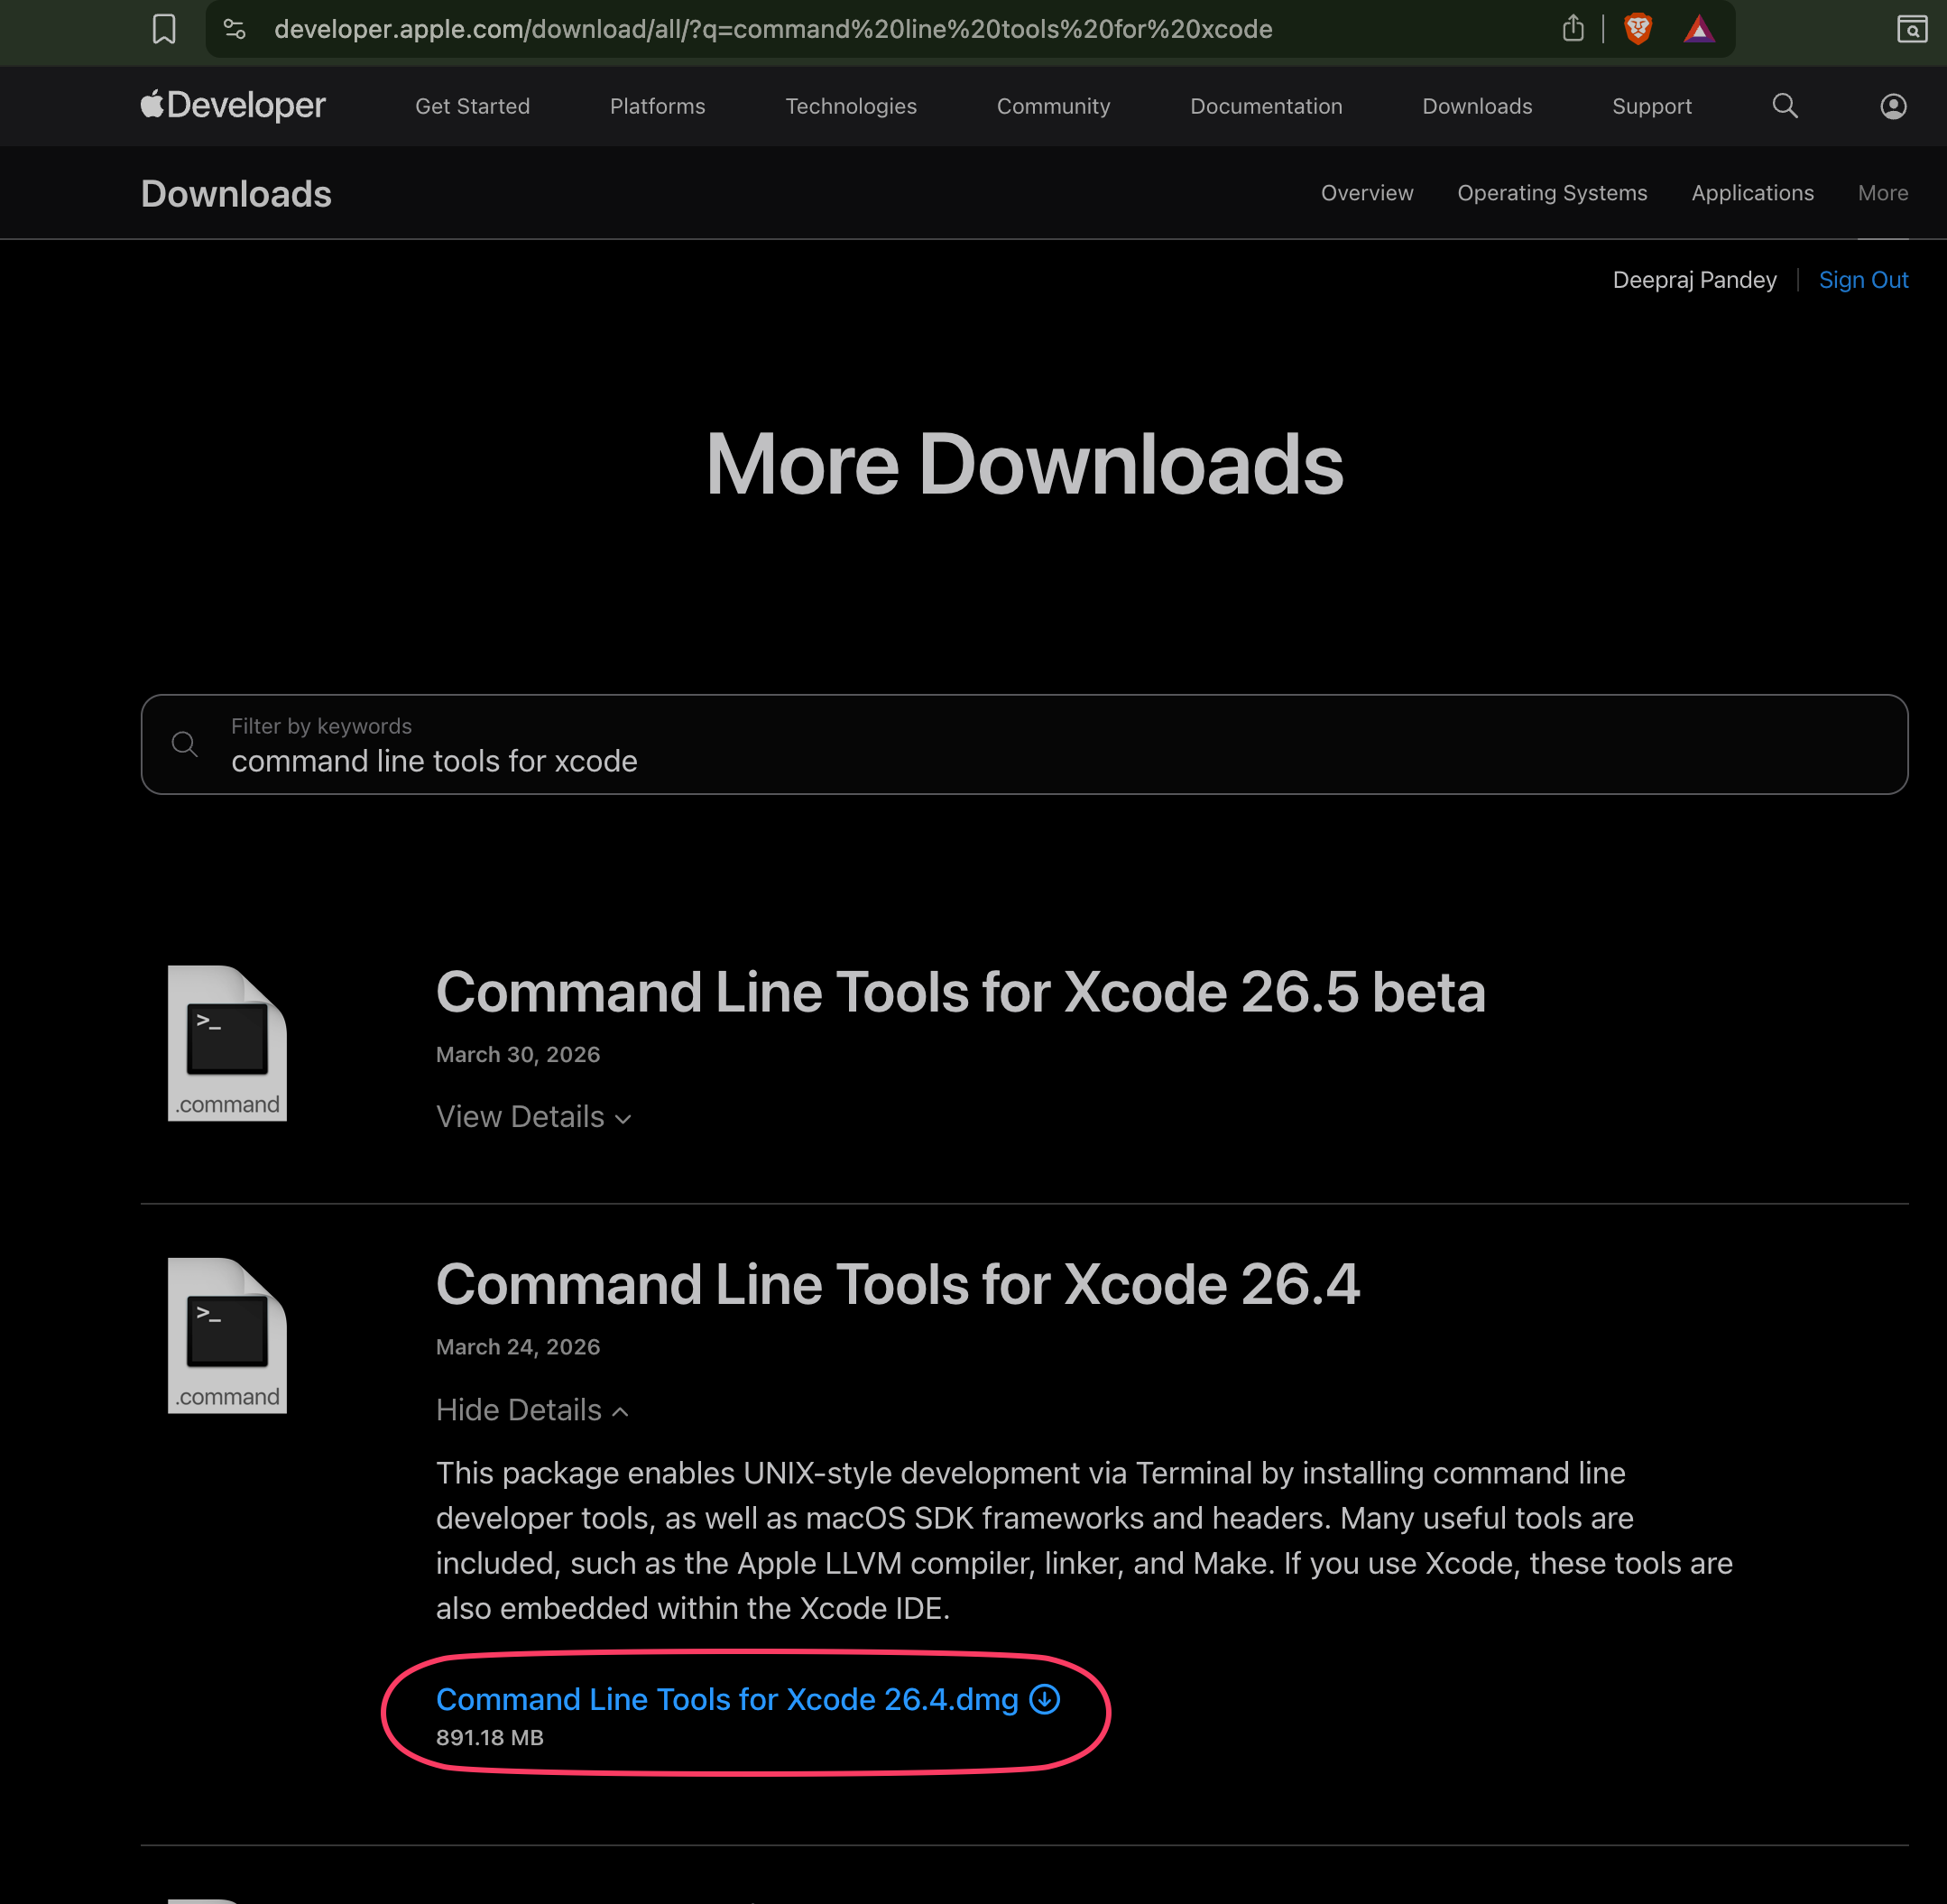
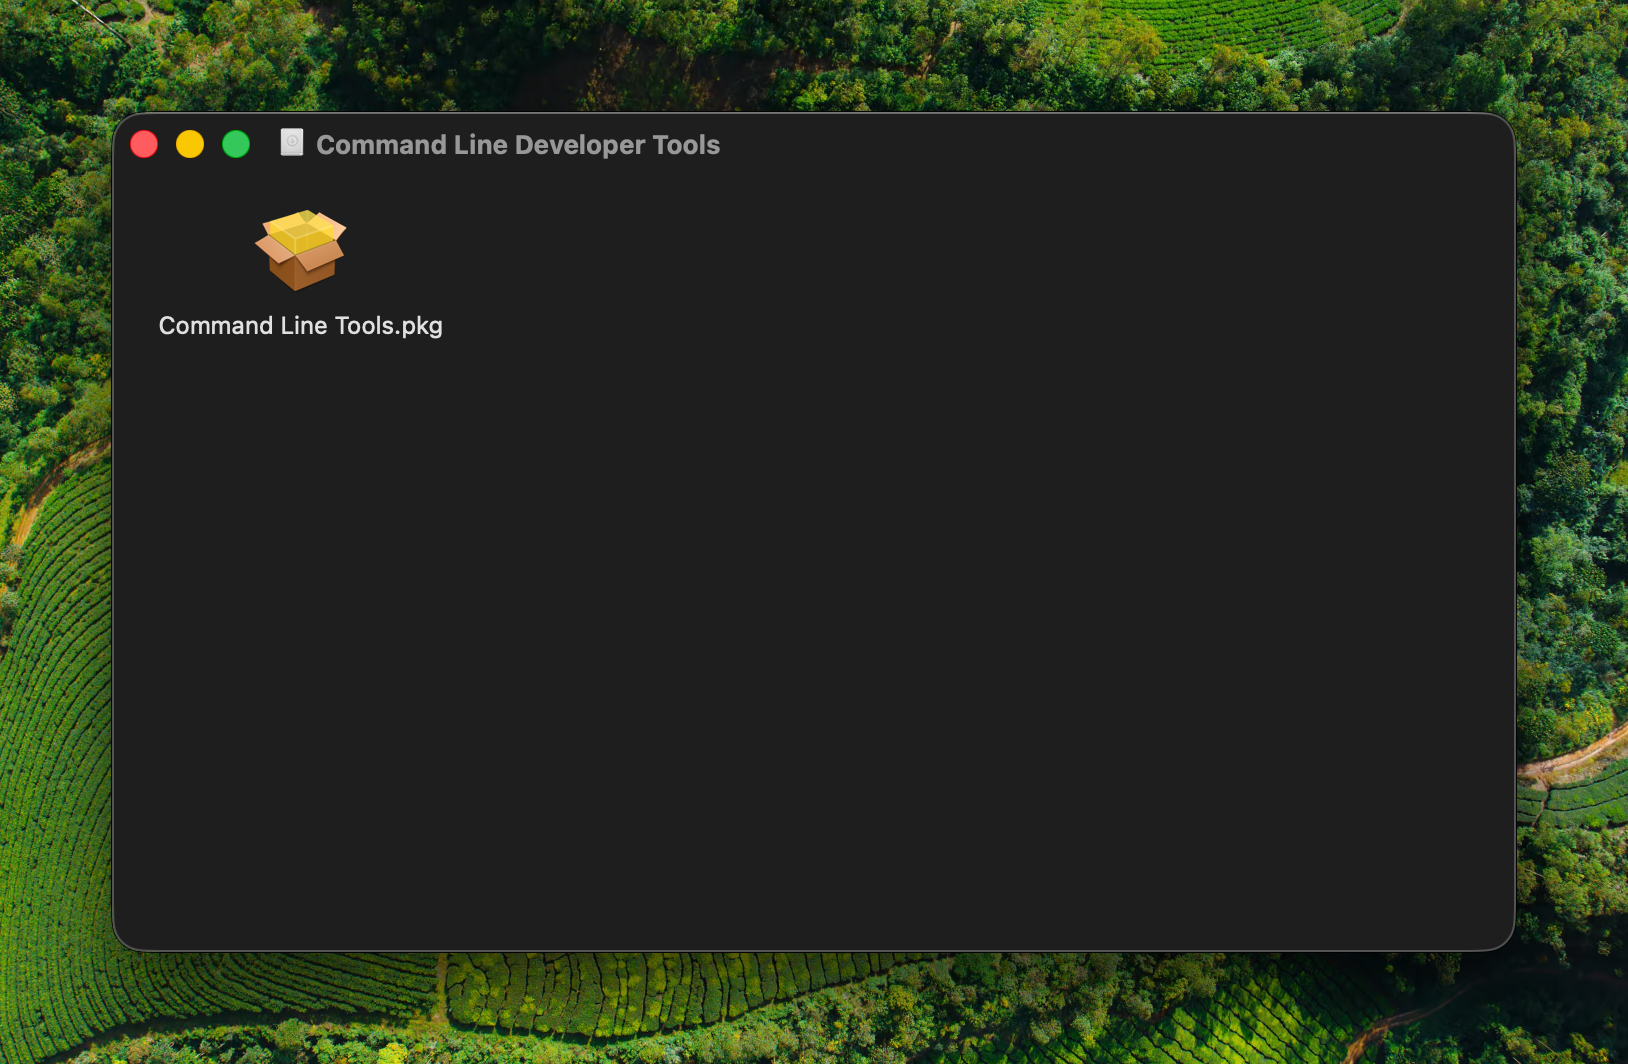
- Download the
.dmg, open it, and runCommand Line Tools.pkg. Click through the installer.
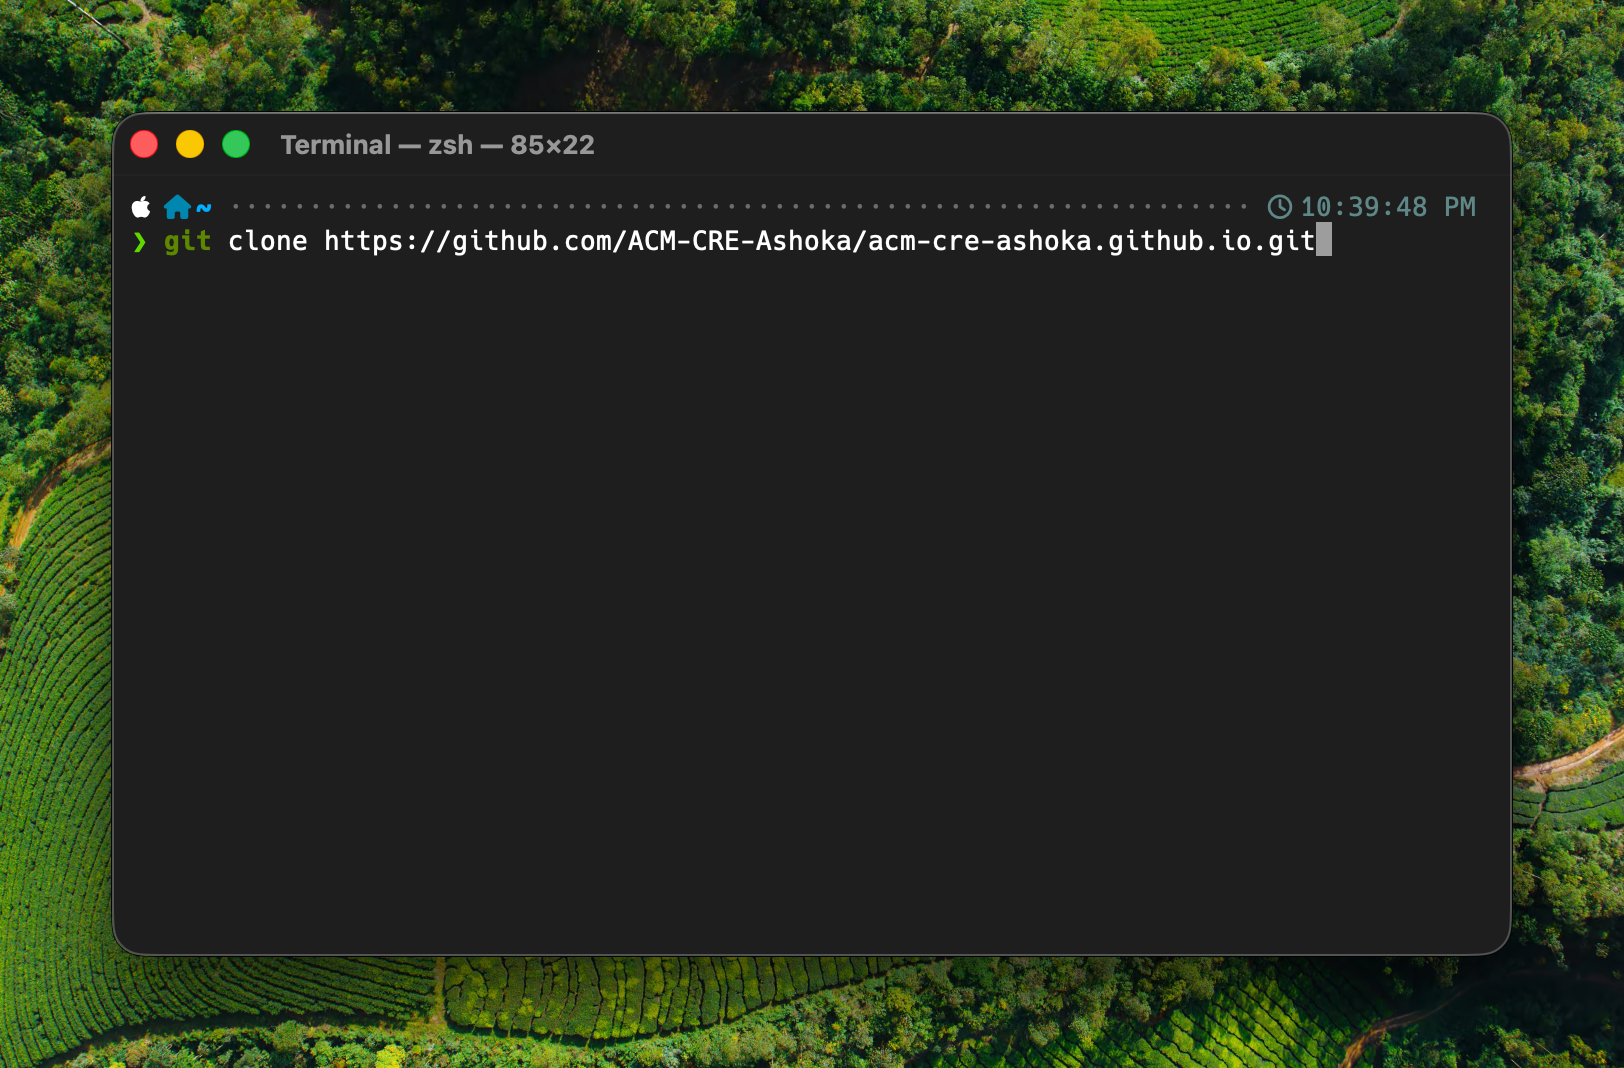
Step 5: Clone your repository
Back in Terminal, paste the git clone command using the URL you copied in Step 2:
git clone https://github.com/<your-org>/<your-repo>.git
When the clone finishes, change into the project directory:
cd <your-repo>

Step 6: Install mise
mise manages programming language versions per project. The template uses it to pin Ruby to the version it was tested with.
Install mise:
curl https://mise.run | sh
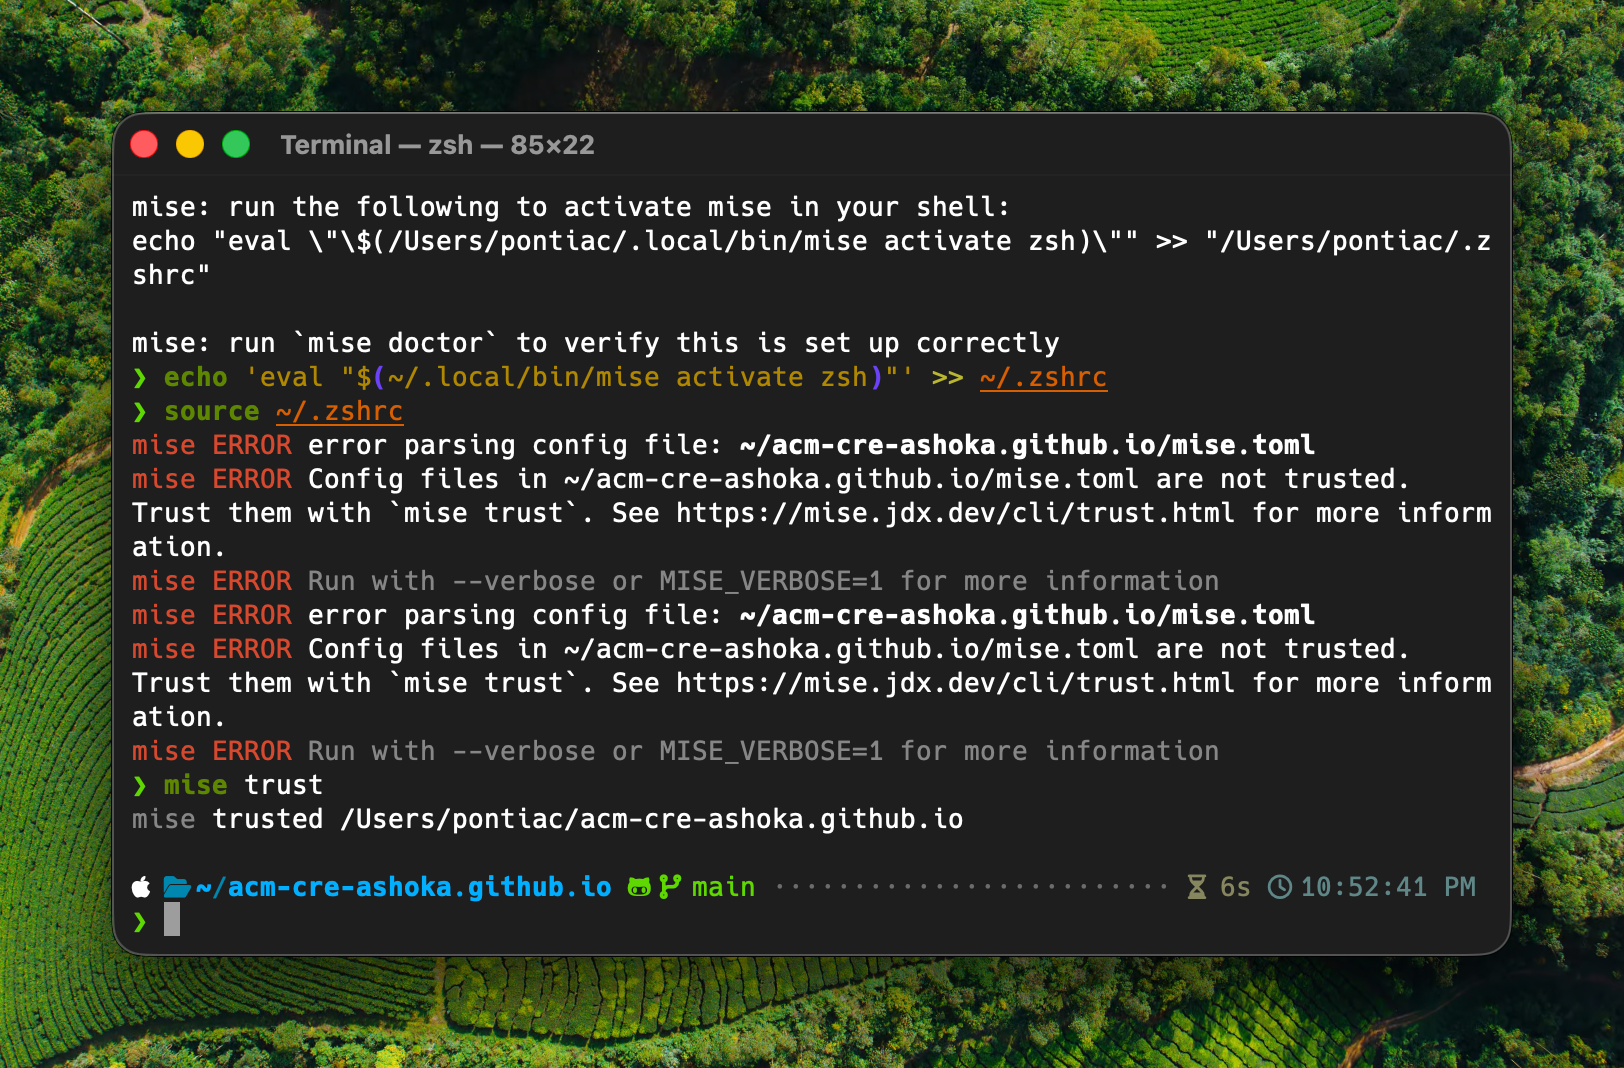
Activate mise in your shell by adding it to your zsh configuration, then sourcing the file so the change takes effect immediately:
echo 'eval "$(~/.local/bin/mise activate zsh)"' >> ~/.zshrc
source ~/.zshrc
When you source ~/.zshrc while inside the project directory, mise will print errors that look like this:
mise ERROR error parsing config file: ~/<your-repo>/mise.toml
mise ERROR Config files in ~/<your-repo>/mise.toml are not trusted.
This is expected. mise refuses to read a project’s mise.toml until you explicitly trust it. The next step fixes this.
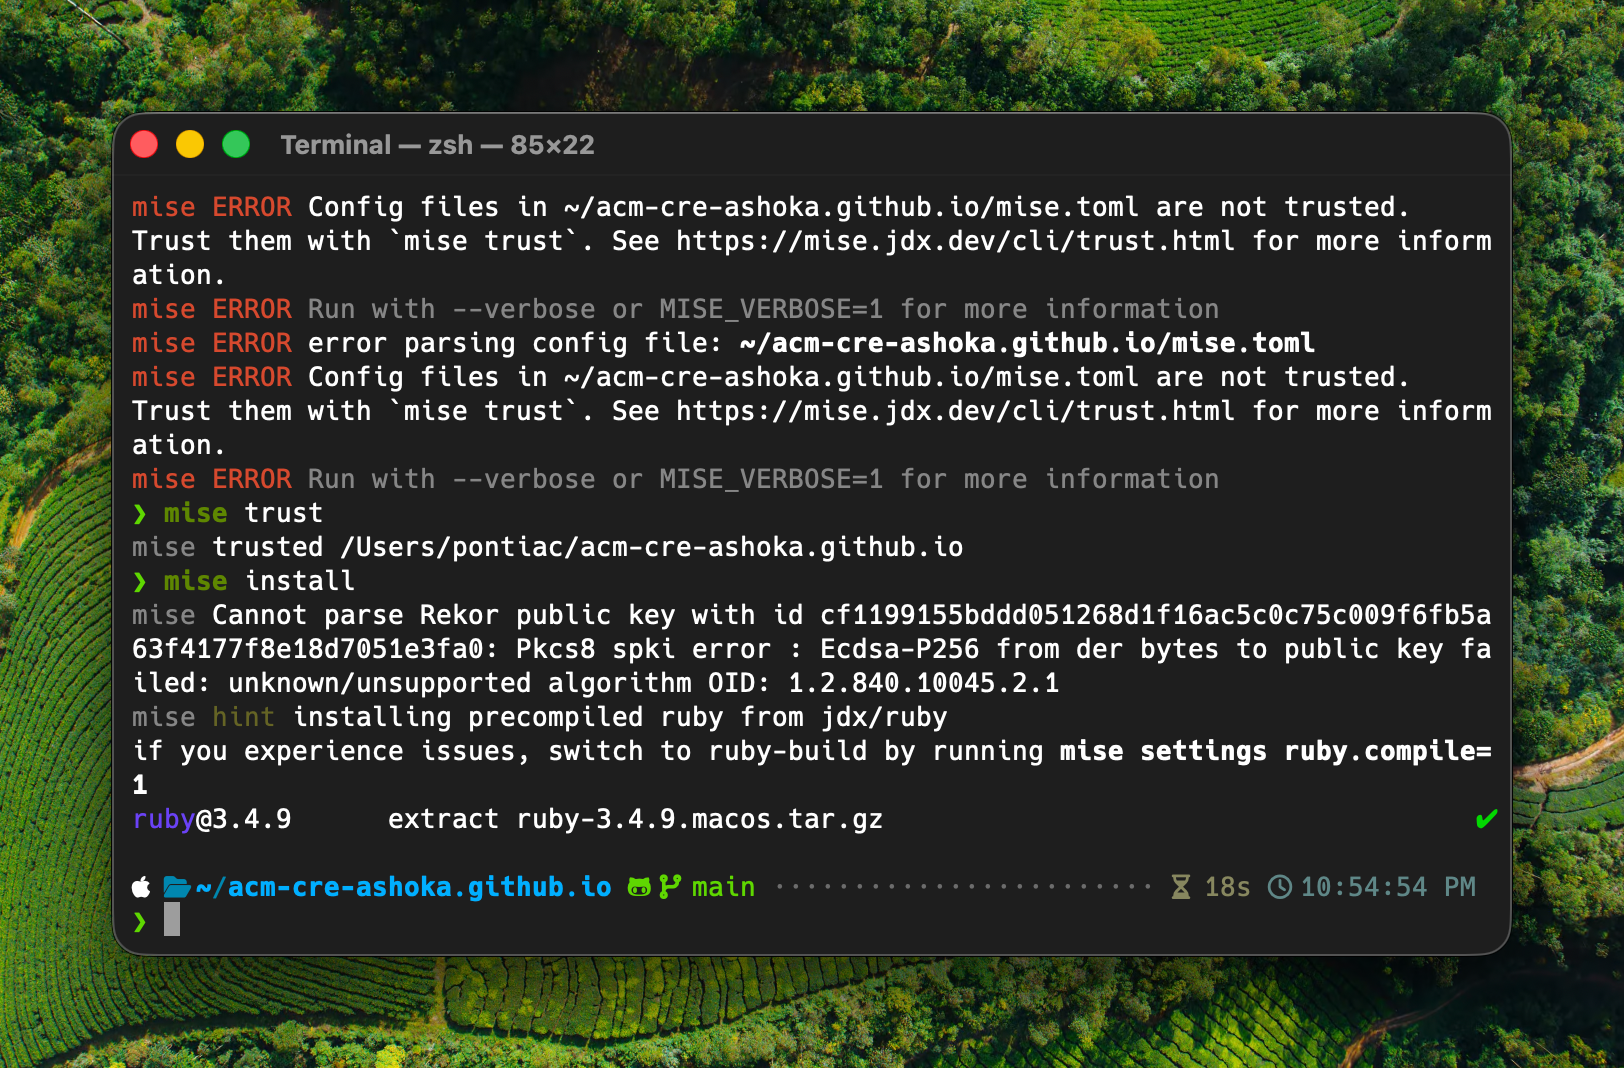
Step 7: Trust mise and install Ruby
Tell mise that this project’s config is safe:
mise trust
Now install Ruby:
mise install
This downloads a precompiled Ruby 3.4 binary. You may see a warning about a Rekor public key:
mise Cannot parse Rekor public key with id cf1199155bddd051268d1f16ac5c0c75c009f6fb5a63f4177f8e18d7051e3fa0: Pkcs8 spki error : Ecdsa-P256 from der bytes to public key failed: unknown/unsupported algorithm OID: 1.2.840.10045.2.1
This warning is harmless. mise is unable to verify one of its signing keys, but the download itself completes successfully.
Verify the install:
mise doctor
You should see “No problems found”.
Step 8: Install dependencies and run the site locally
Install the project’s Ruby gems:
bundle install
Then start the local Jekyll server:
bundle exec jekyll serve
Open http://localhost:4000 in your browser. You should see the example event website.
To stop the server, press Ctrl + C.
Next steps
Having issues?
See the Troubleshooting guide for solutions to common problems.
Setup on Other Platforms
The main Setup guide is written and screenshotted for macOS. This page covers the platform-specific equivalents for Steps 3, 4 and 6 (Open Terminal, install the system toolchain, install mise) on Windows and Linux. Once your terminal and toolchain are ready, return to the main guide and pick up from Step 5 (Clone your repository); the GitHub steps and the rest of the project setup are platform-independent.
Windows
Open a terminal
- Install Windows Terminal from the Microsoft Store.
- Install Git from git-scm.com/download/win. This bundles a working
gitand a Bash environment. - Restart Windows Terminal after installing Git.
Verify Git is installed:
git --version
There is no equivalent of Step 4 (Xcode Command Line Tools) on Windows. Git for Windows already provides everything Ruby gems need to build.
Install mise
curl https://mise.run | sh
Activate mise in PowerShell:
Add-Content -Path $PROFILE -Value 'eval "$(~/.local/bin/mise activate pwsh)"'
Or in Git Bash:
echo 'eval "$(~/.local/bin/mise activate bash)"' >> ~/.bashrc
Close and reopen Windows Terminal so the activation takes effect.
Linux
Open a terminal and install build tools
Open your terminal (Ctrl + Alt + T on most distributions) and install Git, curl and the build toolchain. The toolchain replaces what the Xcode Command Line Tools provide on macOS.
Ubuntu or Debian:
sudo apt update
sudo apt install git curl build-essential
Fedora:
sudo dnf install git curl gcc make
Arch Linux:
sudo pacman -S git curl base-devel
Install mise
curl https://mise.run | sh
Activate mise in Bash:
echo 'eval "$(~/.local/bin/mise activate bash)"' >> ~/.bashrc
source ~/.bashrc
Or in Zsh:
echo 'eval "$(~/.local/bin/mise activate zsh)"' >> ~/.zshrc
source ~/.zshrc
Continue with the main guide
Once git --version and mise --version both work, head back to the main Setup guide and pick up from Step 5 (Clone your repository).
Deployment
Publish your site for free using GitHub Pages.
First-time deployment
Before you deploy, make sure _config.yml has the right url and baseurl for your repository. Wrong values will produce a deployed site that loads but is missing every stylesheet, script, and image. See Event Details → Site settings for the two cases. The rake deploy task will refuse to run while _config.yml still contains template defaults.
Step 1: Deploy
From your project folder:
bundle exec rake deploy
This builds your site and pushes it to a gh-pages branch.
Step 2: Configure GitHub Pages
- Go to your repository on GitHub
- Click Settings (top menu)
- Click Pages (left sidebar)
- Under Source, select Deploy from a branch
- Select gh-pages branch and / (root)
- Click Save
See Configuring a publishing source for more details.
Step 3: Wait for deployment
GitHub will build and deploy your site. This takes 2-5 minutes.
Your site will be available at:
| Setup | URL |
|---|---|
| Organisation | https://acm-cre-university.github.io |
| Personal account | https://username.github.io/acm-cre-university |
Updating your site
After making changes locally:
- Test locally with
bundle exec jekyll serve - When ready, run
bundle exec rake deploy
Changes go live in a few minutes.
Next steps
- Customise your event details
- Quick Reference - find which file to edit
Having issues?
See the Troubleshooting guide for solutions to common deployment problems.
Organisers
Configure your host institution and partner organisations in _data/config/organisers.yml.
These logos and links appear in the site header, footer, and flyer.
Structure
host:
  name: "Your University"
  logo: "/assets/images/organisers/host-logo.svg"
  url: "https://youruniversity.edu"

partners:
  - name: "ACM iSIGCSE"
    logo: "/assets/images/organisers/acm-isigcse-768x256.jpg"
    url: "https://isigcse.acm.org"
  - name: "ACM India Council"
    logo: "/assets/images/organisers/acm-india-council.svg"
    url: "https://india.acm.org"
  - name: "ACM SIGCSE"
    logo: "/assets/images/organisers/acm-sigcse.png"
    url: "https://sigcse.org"
Host institution
The host section configures your university or organisation:
| Field | Required | Description |
|---|---|---|
name | Yes | Institution name (used in alt text and footer) |
logo | Yes | Path to logo file |
url | Yes | Link to institution website |
Adding your logo
- Prepare your logo (SVG recommended, PNG also works)
- Recommended size: approximately 330×125 pixels
- Save to
assets/images/organisers/host-logo.svg - Update the
logopath if using a different filename
The template includes a placeholder logo. Replace it with your institution’s logo.
Partner organisations
The partners array lists ACM organisations that co-host the event. These logos appear alongside your host logo in the header and footer.
| Field | Required | Description |
|---|---|---|
name | Yes | Organisation name |
logo | Yes | Path to logo file |
url | Yes | Link to organisation website |
For standard CRE events, keep the default ACM partner logos (iSIGCSE, India Council, SIGCSE). These are already included in the template.
Where these appear
- Header: Host logo and ACM iSIGCSE logo in the navigation bar
- Footer: All organiser logos with links
- Flyer: All organiser logos at the top
Logo tips
- Use SVG format when possible (scales without quality loss)
- For PNG/JPG, use high resolution (2x display size)
- Ensure logos have transparent backgrounds
- Keep file sizes reasonable (optimise for web)
Next steps
Configure your Event Details (name, date, location).
Event Details
Configure your event’s basic information in these files:
_data/config/organisers.ymlfor host institution and partners (see Organisers)_data/config/site.ymlfor event details_config.ymlfor site settings
Site settings
Edit _config.yml for basic site configuration. The url and baseurl settings depend on what you named your repository on GitHub. Get these wrong and your deployed site will load, but every stylesheet, script, and image will return 404, leaving the page unstyled.
The rule is simple: GitHub Pages serves a repository named <owner>.github.io from the root of that domain, and any other repository from a sub-path matching the repo name.
Case A: repository is named <owner>.github.io
For example, an organisation acm-cre-university with a repo acm-cre-university.github.io. The site will be served from https://acm-cre-university.github.io/.
title: "ACM COMPUTE Regional"
description: "Regional event for computing educators and researchers"
url: "https://acm-cre-university.github.io"
baseurl: ""
lang: en
Case B: repository has any other name
For example, a personal account jane-doe with a repo acm-cre-university, or an organisation acm-cre-university with a repo event-2026. The site will be served from https://<owner>.github.io/<repo-name>/.
title: "ACM COMPUTE Regional"
description: "Regional event for computing educators and researchers"
url: "https://jane-doe.github.io"
baseurl: "/acm-cre-university"
lang: en
The baseurl must start with / and must match your repository name exactly. It tells Jekyll to prefix every internal link and asset URL with that path so they resolve under the sub-path instead of the domain root.
Event information
Edit _data/config/site.yml for event-specific details.
Basic information
event_name: "ACM COMPUTE Regional Event"
tagline: "For Computing Educators & Researchers"
date: "2026-03-21"
date_display: "Saturday, March 21, 2026"
time: "9:30 AM - 6:00 PM"
The date field uses ISO format (YYYY-MM-DD) for sorting. The date_display field is shown to visitors.
Location
location:
  name: "Your University"
  address: "123 Main Street, City, Country"
  url: "https://youruniversity.edu"
  map_url: "https://maps.app.goo.gl/your-map-link"
  map_embed_url: "https://www.google.com/maps/embed?pb=..."
To get the map_embed_url:
- Open Google Maps and find your venue
- Click Share > Embed a map
- Copy the URL from the
srcattribute
Registration
registration:
  free: true
  form_url: "https://tally.so/r/your-form-id"
The template supports embedded forms from Tally, Google Forms, Typeform, or any service that provides an embed URL.
Contact and social links
social:
  email: "cre@youruniversity.edu"
  host_website: "https://youruniversity.edu"
  host_twitter: "https://x.com/YourUniversity"
  host_instagram: "https://instagram.com/youruniversity"
  isigcse_website: "https://isigcse.acm.org/home/"
  isigcse_twitter: "https://x.com/isigcse"
The host_* keys are for your institution’s social links. The isigcse_* keys link to ACM iSIGCSE. Remove any links you don’t need.
Accommodation (optional)
accommodation:
  available: true
  name: "University Guest House"
  location: "On campus"
  price: "INR 1,500 per night"
Set available: false or remove this section if you’re not offering accommodation.
Sponsorship (optional)
sponsors:
  seeking: true
  form_url: "https://tally.so/r/sponsorship-form-id"
Set seeking: false when you’ve finished collecting sponsors.
Complete example
event_name: "Delhi University COMPUTE Regional Event"
tagline: "Empowering CS educators across North India"
date: "2026-04-15"
date_display: "Wednesday, April 15, 2026"
time: "9:00 AM - 5:30 PM"

location:
  name: "Delhi University, North Campus"
  address: "University Road, Delhi 110007, India"
  url: "https://du.ac.in"
  map_url: "https://maps.app.goo.gl/example"
  map_embed_url: "https://www.google.com/maps/embed?pb=..."

registration:
  free: true
  form_url: "https://tally.so/r/your-form-id"

social:
  email: "cre@du.ac.in"
  host_website: "https://du.ac.in"
  host_twitter: "https://x.com/DelhiUniv"

accommodation:
  available: true
  name: "University Guest House"
  location: "North Campus"
  price: "INR 1,200 per night"

sponsors:
  seeking: false
Next steps
Set up your Schedule to add sessions and speakers.
Tip: If you haven’t already, configure your Organisers (host institution and partner logos) first.
Schedule
Configure your event schedule in _data/content/schedule.yml.
Basic structure
The file contains a flat array of sessions:
- time: "09:00"
  end_time: "09:30"
  title: "Registration & Coffee"
  type: break

- time: "09:30"
  end_time: "10:30"
  title: "Opening Keynote"
  type: keynote
  speaker: "jane-doe"
  description: "Welcome and introduction to the event."
Session fields
| Field | Required | Description |
|---|---|---|
time | Yes | Start time (24-hour format) |
end_time | No | End time |
title | Yes | Session title |
type | Yes | Session type (see below) |
description | No | Short description (1-2 sentences) |
speaker | No | Single speaker ID |
speakers | No | Array of speaker IDs |
facilitators | No | Array of facilitator IDs |
Session types
Each type has a different colour on the schedule:
| Type | Use for |
|---|---|
keynote | Main talks |
workshop | Hands-on sessions |
discussion | Panel discussions, Q&A |
break | Coffee, lunch, registration |
ceremony | Opening, closing, awards |
Linking speakers
The speaker field should match a speaker’s ID from speakers/en.yml:
# In schedule.yml
- title: "Keynote"
  speaker: "jane-doe"

# In speakers/en.yml
keynote:
  - id: "jane-doe"
    name: "Dr. Jane Doe"
Multiple speakers
For sessions with multiple speakers, use the speakers array:
- title: "Panel Discussion"
  type: discussion
  speakers:
    - "jane-doe"
    - "john-smith"
Facilitators
For workshops with facilitators, use IDs from speakers/en.yml:
- title: "Educator Workshop"
  type: workshop
  facilitators:
    - jane-doe
    - john-smith
  description: "Hands-on session for CS educators."
Facilitator IDs must match entries in the facilitators section of your speakers file.
Complete example
- time: "09:30"
  end_time: "10:00"
  title: "Registration"
  type: break
  description: "Registration, morning tea, and networking"

- time: "10:00"
  end_time: "10:30"
  title: "Opening"
  type: keynote
  speaker: "keynote-speaker"
  description: "Introduction to COMPUTE and regional events"

- time: "10:30"
  end_time: "11:30"
  title: "Discussion Forum"
  type: discussion
  facilitators:
    - jane-doe
    - john-smith
  description: "Group discussions on CS education challenges"

- time: "11:30"
  end_time: "13:00"
  title: "Workshop: Experience Reports"
  type: workshop
  facilitators:
    - jane-doe
  description: "Hands-on session for writing experience reports"

- time: "13:00"
  end_time: "14:00"
  title: "Lunch"
  type: break

- time: "17:30"
  end_time: "18:00"
  title: "Closing Ceremony"
  type: ceremony
  description: "Key takeaways and wrap-up"
Tips
- Keep descriptions short (1-2 sentences)
- Include buffer time for transitions
- Test the schedule page locally to check formatting
Next steps
Add your People (speakers, facilitators, organisers).
People
Configure speakers, facilitators, and organisers in _data/content/speakers/en.yml.
Structure
keynote:
  - id: "jane-doe"
    name: "Dr. Jane Doe"
    affiliation: "University Name"
    photo: "/assets/images/speakers/jane-doe.jpg"

facilitators:
  - id: "john-smith"
    name: "John Smith"
    affiliation: "Another University"
    photo: "/assets/images/speakers/john-smith.jpg"

organisers:
  - id: "organiser-name"
    name: "Organiser Name"
    affiliation: "Your University"
    photo: "/assets/images/speakers/organiser-name.jpg"
Fields
| Field | Required | Description |
|---|---|---|
id | Yes | Unique identifier (used for linking from schedule) |
name | Yes | Full name |
affiliation | Yes | University or organisation |
photo | No | Path to photo |
About IDs
The id field links people to schedule sessions. The template includes placeholder IDs like facilitator-1 and facilitator-2. Replace these with meaningful IDs for your speakers:
# Template placeholder
- id: "facilitator-1"
  name: "Facilitator One"

# Your actual speaker
- id: "jane-doe"
  name: "Dr. Jane Doe"
Important: When you change an ID here, update all references in schedule.yml to match. See Schedule for details on linking speakers.
Adding photos
- Prepare a square photo (recommended: 400x400 pixels)
- Save it to
assets/images/speakers/ - Reference it with the full path:
/assets/images/speakers/filename.jpg
If a section has any photos, people without photos will show a placeholder with their initial.
Photo tips
- Use square images for consistent display
- Optimise for web (compress to reduce file size)
- Use descriptive filenames (lowercase, no spaces)
Multiple languages
For Hindi (or other languages), create a corresponding file at _data/content/speakers/hi.yml with translated content.
Next steps
Add your Sponsors.
Sponsors
Configure sponsor tiers and logos in _data/content/sponsors.yml.
Structure
seeking_sponsors: true
sponsorship_email: "cre@youruniversity.edu"

tiers:
  - name: "Platinum"
    sponsors:
      - name: "Company A"
        logo: "/assets/images/sponsors/company-a.png"
        url: "https://company-a.com"

  - name: "Gold"
    sponsors:
      - name: "Company B"
        logo: "/assets/images/sponsors/company-b.png"
        url: "https://company-b.com"
      - name: "Company C"
        logo: "/assets/images/sponsors/company-c.png"
        url: "https://company-c.com"
Top-level fields
| Field | Required | Description |
|---|---|---|
seeking_sponsors | No | Set to true to show sponsorship enquiry section |
sponsorship_email | No | Email for sponsorship enquiries |
Sponsor fields
| Field | Required | Description |
|---|---|---|
name | Yes | Sponsor/company name |
logo | No | Path to logo (shows name if missing) |
url | No | Link to sponsor’s website |
Adding logos
- Get the sponsor’s logo (SVG preferred, PNG with transparent background also works)
- Recommended size: approximately 300×90 pixels (or similar aspect ratio)
- Save to
assets/images/sponsors/ - Reference with full path:
/assets/images/sponsors/logo.png
Logo tips
- SVG format is preferred (scales without quality loss)
- For PNG/JPG, use high resolution (2x display size)
- Ensure logos have transparent backgrounds
- Optimise file sizes for web (compress images)
Placeholder logo
The template includes a placeholder at assets/images/sponsors/sponsor-placeholder.svg. This shows “Sponsor Logo” with recommended dimensions. Replace it with actual sponsor logos, or use it as a reference for sizing.
If a sponsor doesn’t have a logo, their name will be displayed instead.
Tier display
Higher tiers display larger logos. The order in the file determines display order.
Minimal setup
If you don’t have tiered sponsorship, use a single tier:
tiers:
  - name: "Sponsors"
    sponsors:
      - name: "Sponsor Name"
        logo: "/assets/images/sponsors/logo.png"
        url: "https://sponsor.com"
Disabling sponsors
If you don’t have sponsors yet, disable the sponsors section. See Feature Toggles.
Next steps
Customise your site’s Styling (colours, fonts).
Styling
Customise colours, fonts, and spacing in _sass/_variables.scss.
Brand colour
The accent colour is used for buttons, links, and highlights:
$color-accent: #C45C3E;
$color-accent-hover: #A34D33;
$color-accent-light: rgba(196, 92, 62, 0.08);
When changing $color-accent, update the hover and light variants to match:
$color-accent-hover: slightly darker version$color-accent-light: same colour at 8% opacity
Choosing a brand colour
Pick a colour that:
- Matches your university/organisation branding
- Has enough contrast with white (for accessibility)
- Works for both light and dark elements
Use a contrast checker to verify accessibility.
Text colours
$color-text: #2D2D2D;         // Main text
$color-text-muted: #6B6B6B;   // Secondary text
$color-text-subtle: #9A9A9A;  // Tertiary text
Background colours
$color-bg: #FFFFFF;           // Main background
$color-bg-subtle: #F7F7F7;    // Subtle background (cards, sections)
$color-border: #E5E5E5;       // Borders
Typography
$font-family-sans-serif: "Outfit", system-ui, -apple-system, sans-serif;
$headings-font-weight: 600;
$font-weight-normal: 400;
$font-weight-semibold: 600;
The template uses Outfit by default. To use a different font:
- Add the font import to
_includes/layout/head.html - Update
$font-family-sans-serif
Session type colours
Each session type on the schedule has its own colour:
$color-keynote: #C45C3E;      // Orange
$color-workshop: #2A7B72;     // Teal
$color-discussion: #5B7A9D;   // Blue
$color-ceremony: #C08B32;     // Gold
$color-break: #9A9A9A;        // Grey
Spacing
$space-xs: 0.5rem;   // 8px
$space-sm: 1rem;     // 16px
$space-md: 2rem;     // 32px
$space-lg: 3rem;     // 48px
$space-xl: 4rem;     // 64px
Layout
$container-max-width: 960px;  // Maximum content width
$text-max-width: 65ch;        // Maximum text line length
Border radius
The template uses sharp corners by default:
$border-radius: 0;
$border-radius-lg: 0;
$border-radius-sm: 0;
For rounded corners, try 0.25rem or 0.5rem.
After making changes
Restart Jekyll to see your changes:
# Stop current server (Ctrl + C)
bundle exec jekyll serve
Next steps
You’ve completed the basic customisation. For advanced options:
Custom Domain
You can use your own domain like cre.youruniversity.edu instead of the default GitHub Pages URL.
See About custom domains and GitHub Pages for an overview.
Step 1: Add CNAME file
Create a file called CNAME (no extension) in your repo root:
cre.youruniversity.edu
Step 2: Configure DNS
Add a CNAME record with your domain provider:
- Name:
cre(or your subdomain) - Value:
acm-cre-university.github.io(your GitHub Pages URL)
Step 3: Enable in GitHub Pages
- Go to Settings > Pages
- Under Custom domain, enter your domain
- Check Enforce HTTPS (after DNS propagates)
DNS changes can take up to 48 hours to propagate.
See Managing a custom domain for detailed instructions.
Having issues?
See the Troubleshooting guide for solutions to common domain problems.
Adding Languages
The template supports multiple languages. By default, it includes English and Hindi.
How it works
- Each language has its own string file in
_data/strings/ - Content pages are duplicated per language (e.g.,
_pages/for English,hi/for Hindi) - The language switcher auto-discovers available languages from the strings files
Adding a new language
Step 1: Create strings file
Copy _data/strings/en.yml to _data/strings/[code].yml:
cp _data/strings/en.yml _data/strings/es.yml
Edit the new file and translate all strings:
# _data/strings/es.yml
nav:
  home: "Inicio"
  schedule: "Programa"
  people: "Personas"
  register: "Registrarse"
  # ... translate all sections
Add your language to the language_switcher section:
language_switcher:
  label: "Idioma"
  en: "English"
  hi: "हिन्दी"
  es: "Español"  # Add your language
Step 2: Create content folder
Create a folder for your language:
mkdir es
Step 3: Create content pages
For each page in _pages/, create a translated version in your language folder.
Each page needs this front matter:
---
layout: home
title: "Bienvenidos"
lang: es
permalink: /es/
alternate:
  en: /
  hi: /hi/
---

Tu contenido traducido aquí.
The alternate field maps language codes to their page URLs. This enables the language switcher to link between translations.
Step 4: Update existing pages
Add your new language to the alternate field on existing pages:
# In _pages/index.md (English)
alternate:
  en: /
  hi: /hi/
  es: /es/  # Add this
Do this for all pages that have translations.
Speaker translations
For translated speaker information, create language-specific files:
_data/content/speakers/
├── en.yml
├── hi.yml
└── es.yml
Tips
- Start with the most important pages
- Keep the same file structure across languages
- Test all language switcher links
- Some content doesn’t need translation (dates, times, names)
Disabling multi-language
If you only need one language, disable i18n in _config.yml:
features:
  i18n: false
This hides the language switcher. See Feature Toggles.
Next steps
- Feature Toggles - enable/disable site sections
Feature Toggles
Control which sections of your site are enabled or disabled. Useful for events that don’t need all features, or while you’re still preparing content.
Configuration
Edit _config.yml and find the features section:
features:
  i18n: true        # Multi-language support and language switcher
  sponsors: true    # Sponsors page and section
  flyer: true       # Flyer page and spread-the-word flyer section
  venue: true       # Venue page
Set any feature to false to disable it.
Available toggles
| Feature | What it controls |
|---|---|
i18n | Language switcher in header, alternate language pages |
sponsors | Sponsors page, sponsor logos on flyer |
flyer | Flyer page, flyer download cards on spread-the-word page |
venue | Venue page with location details and map |
What happens when disabled
When you disable a feature:
- Navigation hides - Links to that section disappear from the menu
- Page shows notice - Direct URL visits see “Page Not Available” message
- SEO protected - Disabled pages get
noindexmeta tag so search engines skip them - Related sections hide - In-page elements (like sponsor logos on flyer) are hidden
Pages aren’t deleted - they’re just hidden. Re-enable the feature anytime to bring them back.
Examples
Event without sponsors yet
features:
  sponsors: false
The sponsors page link disappears from navigation. If someone visits /sponsors/ directly, they see a friendly “Page Not Available” message.
Single-language event
features:
  i18n: false
The language switcher disappears from the header. Your site runs in one language only.
Minimal event site
features:
  i18n: false
  sponsors: false
  flyer: false
  venue: false
Just the essentials: home, schedule, people, and registration.
Navigation configuration
Feature toggles work with the navigation system. In _data/config/navigation.yml, items can specify which feature they require:
- label: sponsors
  url: /sponsors/
  feature: sponsors    # Only shows when sponsors feature is enabled
You don’t need to edit this for basic usage - the template is pre-configured. This is just for reference if you’re adding custom pages.
Re-enabling features
To re-enable a feature:
- Set it to
truein_config.yml - Restart your local server (
Ctrl+C, thenbundle exec jekyll serve) - The navigation link and page content reappear
No content is lost when toggling features off and on.
Next steps
- Troubleshooting - Fix common issues
- Custom Domain - Use your own domain
Quick Reference
A lookup table for finding which file to edit.
Configuration files
| What to change | Which file |
|---|---|
| Host institution & partner logos | _data/config/organisers.yml |
| Event name, date, location | _data/config/site.yml |
| Navigation menu | _data/config/navigation.yml |
| Event schedule | _data/content/schedule.yml |
| Speakers & organisers | _data/content/speakers/en.yml |
| Sponsors | _data/content/sponsors.yml |
| Colours & fonts | _sass/_variables.scss |
| UI text (buttons, labels) | _data/strings/en.yml |
| Feature toggles | _config.yml |
Customisation guides
| Topic | Guide |
|---|---|
| Host institution & partner logos | Organisers |
| Site identity, contact, registration | Event Details |
| Sessions, times, speakers | Schedule |
| Speakers, facilitators, organisers | People |
| Sponsor tiers and logos | Sponsors |
| Colours, fonts, spacing | Styling |
| Multi-language support | Adding Languages |
| Enable/disable sections | Feature Toggles |
YAML basics
YAML files use a simple format:
event:
  name: "My University CRE"
  date: "March 21, 2026"
Rules:
- Indentation matters (use 2 spaces, not tabs)
- Strings with special characters need quotes
- Lists use dashes:
- item
See yaml.org for the full specification.
Troubleshooting
Common problems and how to fix them.
Setup Issues
“command not found: mise”
Cause: mise isn’t in your PATH, or Terminal wasn’t restarted.
Fix: Close Terminal completely and reopen it. On macOS, use Cmd + Q to fully quit.
“command not found: bundle” or “command not found: jekyll”
Cause: Ruby isn’t installed or mise isn’t activated.
Fix: Check which Ruby is being used:
which ruby
If it shows /usr/bin/ruby (system Ruby), mise isn’t working. Try:
mise trust
mise install
“bundle install” fails with permission errors
Cause: You’re using system Ruby instead of mise Ruby.
Fix: Check which ruby. It should show a path containing .local/share/mise/. If not, ensure mise is activated in your shell config.
bundle install fails with 'iostream' file not found (macOS)
Your Xcode Command Line Tools install is broken or incomplete. If you skipped Step 4 of Setup, start there. If you already ran it and still hit this, the install is in an inconsistent state and needs to be reinstalled. The C++ standard library headers are missing from the location clang searches first, so any gem with C++ native extensions (eventmachine, google-protobuf, etc.) fails to build.
You can confirm this is the issue by running:
echo '#include <iostream>
int main(){}' | clang++ -x c++ - -o /tmp/t
If you see 'iostream' file not found, it’s this problem.
To fix it, reinstall Command Line Tools. The version must match your macOS version (e.g. macOS 26.0.1 needs the matching CLT release).
sudo rm -rf /Library/Developer/CommandLineTools
xcode-select --install
Click through the installer dialog and wait for it to finish.
If xcode-select --install fails with “Xcode is not currently available from the software update server”, this can happen on older macOS versions where Apple no longer serves CLT through Software Update. Download the installer manually instead:
- Go to developer.apple.com/download/all (you’ll need to sign in with an Apple ID)
- Find the Command Line Tools for Xcode release that matches your macOS version
- Download the
.dmgand run the installer
After install, verify with the clang++ test above, then retry bundle install.
“Your Ruby version is X, but your Gemfile specified Y”
Cause: The project expects a different Ruby version than what you have.
Fix:
mise install
This installs the correct Ruby version defined in mise.toml.
Build Issues
Jekyll build fails with “Liquid syntax error”
Cause: There’s a typo in a template file.
Fix: The error message will tell you which file and line number. Check for:
- Unclosed
{% %}or{{ }}tags - Missing
endiforendfor - Typos in variable names
Changes not showing up
Cause: Browser cache or Jekyll didn’t rebuild.
Fix:
- Hard refresh:
Cmd + Shift + R(macOS) orCtrl + Shift + R(Windows/Linux) - Stop Jekyll (
Ctrl + C) and restart:bundle exec jekyll serve
Images not loading
Cause: Wrong file path or filename.
Fix: Check that:
- The image file exists in
assets/images/ - The filename in your YAML matches exactly (case-sensitive)
- You’re using the correct path format:
/assets/images/speakers/jane-doe.jpg
YAML Issues
Indentation errors
Cause: YAML requires spaces, not tabs. Wrong indentation breaks the file.
Fix: Configure your editor to use spaces (2 spaces per indent). Look for mixed tabs/spaces:
# Wrong (tabs or inconsistent)
event:
	name: "My Event"    # Tab character

# Correct (2 spaces)
event:
  name: "My Event"
Strings with special characters
Cause: Values containing colons, quotes, or special characters need to be quoted.
Fix: Wrap the value in quotes:
# Wrong
description: Welcome: An Introduction

# Correct
description: "Welcome: An Introduction"
YAML changes not appearing
Cause: Jekyll doesn’t always detect YAML file changes.
Fix: Stop the server (Ctrl + C) and restart:
bundle exec jekyll serve
Field Name Issues
People not displaying
Cause: Using wrong field names in speakers/en.yml.
Fix: Check these common mistakes:
| Wrong | Correct |
|---|---|
image: | photo: |
keynote_speakers: | keynote: |
role: | (not used) |
bio: | (not used) |
Event details not showing
Cause: Using wrong field names in site.yml.
Fix: Check these common mistakes:
| Wrong | Correct |
|---|---|
event.name | event_name |
venue: | location: |
contact.email | social.email |
Facilitators not appearing on schedule
Cause: Using names instead of IDs in schedule.yml.
Fix: Use facilitator IDs that match entries in speakers/en.yml:
# Wrong
facilitators:
  - "Dr. Jane Doe"

# Correct
facilitators:
  - jane-doe
Language Issues
Language switcher not working
Cause: Wrong front matter format or missing language in strings.
Fix: Check the alternate field uses an object, not separate fields:
# Wrong
alternate_lang: en
alternate_url: /

# Correct
alternate:
  en: /
  hi: /hi/
Also ensure your language is listed in _data/strings/[lang].yml under language_switcher.
Deployment Issues
“gh-pages branch not found” when deploying
Cause: First-time deployment hasn’t created the branch yet.
Fix: Run the deploy command:
bundle exec rake deploy
This creates the gh-pages branch automatically.
Site shows 404 after deployment
Cause: GitHub Pages isn’t configured correctly.
Fix:
- Go to your repo on GitHub
- Settings → Pages
- Under “Source”, select “Deploy from a branch”
- Select
gh-pagesbranch and/ (root) - Save and wait a few minutes
Deployed site loads but CSS, JS and images are missing
The page shows up at your GitHub Pages URL but it’s unstyled, no images load, and the browser devtools Network tab shows 404s for /assets/css/style.css and similar files. The 404 URLs point at your domain root (e.g. https://jane-doe.github.io/assets/...) instead of your project sub-path (https://jane-doe.github.io/acm-cre-university/assets/...).
This means _config.yml has the wrong baseurl for your repository. GitHub Pages serves any repo whose name does not end in .github.io from a sub-path matching the repo name, and Jekyll needs baseurl set so it can prefix every internal URL with that sub-path.
Open _config.yml and set baseurl to /your-repo-name (with the leading slash, matching the repo name exactly). See Event Details → Site settings for the full explanation and both cases. Then redeploy:
bundle exec rake deploy
Site shows old content after deployment
Cause: GitHub Pages cache or CDN delay.
Fix: Wait 5-10 minutes. GitHub Pages can take time to update. You can also:
- Check the deployment status in GitHub → Actions tab
- Hard refresh your browser
Still stuck?
- Check existing GitHub Issues
- Open a new issue with:
- What you were trying to do
- The exact error message
- Your operating system
- Output of
mise doctorandruby --version
Glossary
Technical terms explained in plain English.
A
API
Application Programming Interface. A way for different software programs to talk to each other.
B
Branch
A separate version of your code. Like making a copy to experiment with, without affecting the original.
baseurl
A Jekyll setting that adds a path prefix to all URLs. Used when your site isn’t at the root of a domain (e.g., username.github.io/my-site/).
Bundle / Bundler
A tool that installs Ruby packages (gems) for your project. When you run bundle install, it reads the Gemfile and installs everything listed there.
C
Clone
Downloading a copy of a repository from GitHub to your computer.
CNAME
A DNS record type that points one domain to another. Used to set up custom domains for GitHub Pages.
Commit
A saved snapshot of your changes. Like a checkpoint in a video game.
COMPUTE
An ACM conference focused on computing education, run by iSIGCSE (ACM India Special Interest Group on CS Education). COMPUTE Regional Events bring this community together locally.
CRE
COMPUTE Regional Event. A local gathering of CS educators and researchers, using the ACM CRE template for their event website.
D
Deploy
Publishing your website so others can see it on the internet.
DNS
Domain Name System. Translates domain names (like example.com) to IP addresses. You configure DNS records to point your custom domain to GitHub Pages.
F
Fork
Creating your own copy of someone else’s repository on GitHub.
Feature toggle
A setting that enables or disables a feature. In the ACM CRE template, feature toggles in _config.yml control which sections (sponsors, venue, i18n) are visible.
Front matter
The section at the top of a markdown file between --- marks. It contains settings for that page.
---
layout: default
title: My Page
---
G
Gem
A Ruby package. Like an app for Ruby that adds functionality.
gh-pages
A branch name commonly used for GitHub Pages deployments. The deploy script builds your site and pushes it to this branch.
Git
A version control system that tracks changes to your files over time.
GitHub
A website that hosts Git repositories and provides tools for collaboration.
GitHub Pages
A free service from GitHub that hosts static websites directly from a repository.
H
HTML
HyperText Markup Language. The code that structures web pages.
I
i18n
Short for “internationalisation” (i + 18 letters + n). The process of designing software to support multiple languages. In the ACM CRE template, the i18n feature toggle enables multi-language support.
J
Jekyll
A static site generator. It takes your content (markdown files) and templates, and builds a complete website.
L
Liquid
A templating language used by Jekyll. The {{ }} and {% %} syntax you see in templates.
Local / Localhost
Your own computer. “Running locally” means running on your machine, not on the internet.
M
Markdown
A simple way to format text. **bold** becomes bold, # Heading becomes a heading.
mise
A tool that manages programming language versions. Ensures everyone uses the same Ruby version.
P
Pull Request (PR)
A proposal to merge your changes into another branch or repository.
Push
Uploading your commits from your computer to GitHub.
R
Repository (Repo)
A folder containing your project files and their complete history.
Ruby
A programming language. Jekyll is built with Ruby.
S
Sass / SCSS
A way to write CSS with extra features like variables. Jekyll compiles it to regular CSS.
Static Site
A website made of fixed files (HTML, CSS, images) with no database or server-side code. Fast and secure.
T
Template
A reusable starting point. The ACM CRE template gives you a website structure you can customise.
Terminal
A text-based interface for running commands on your computer. Also called command line, console, or shell.
Y
YAML
A format for configuration files. The .yml files in _data/ are YAML. Uses indentation and colons:
event:
  name: My Event
  date: 2026-03-21
What is a CRE?
A COMPUTE Regional Event (CRE) is a local gathering that brings together computer science educators, researchers, and practitioners to share knowledge and build community.
Purpose
CREs aim to:
- Share teaching practices and innovations
- Discuss challenges in CS education
- Build regional networks of CS educators
- Provide professional development opportunities
- Connect educators with ACM and iSIGCSE resources
Who attends?
- University faculty and lecturers
- High school CS teachers
- Graduate students interested in CS education
- Industry professionals involved in education
- Anyone passionate about CS education
Format
A typical CRE includes:
- Keynote talks from experienced educators
- Workshops on teaching techniques
- Discussion sessions on current challenges
- Networking opportunities
Events are usually one day, making them accessible for busy educators.
Why host one?
Hosting a CRE at your institution:
- Raises your department’s profile
- Brings educators to your campus
- Creates professional development for your faculty
- Connects you with the broader ACM community
- Gives students exposure to CS education as a career
Getting started
- Find a faculty champion
- Secure a date and venue
- Set up your website (that’s what this template is for!)
- Reach out to potential speakers
- Promote to regional educators
See Planning Your Event for detailed guidance.
Planning Your Event
A guide to organising a successful COMPUTE Regional Event.
Timeline
3-4 months before
- Secure venue and date
- Identify potential keynote speakers
- Set up your event website
- Create registration form
- Draft budget
2-3 months before
- Confirm speakers
- Open registration
- Begin promotion
- Arrange catering
- Plan AV requirements
1 month before
- Finalise schedule
- Send reminders to registrants
- Prepare materials (badges, programmes)
- Confirm all logistics
1 week before
- Final headcount to catering
- Test all AV equipment
- Brief volunteers
- Prepare feedback forms
Day of event
- Arrive early for setup
- Welcome attendees
- Take photos
- Collect feedback
Budget considerations
Typical costs include:
- Venue (may be free if at your institution)
- Catering (coffee, lunch)
- Speaker travel (if needed)
- Printing (badges, programmes)
- AV equipment rental
Funding sources:
- Department budget
- ACM/iSIGCSE support
- Sponsorships
- Registration fees (keep low to maximise attendance)
Promotion
Reach educators through:
- Email to regional CS departments
- Professional mailing lists
- Social media
- ACM/iSIGCSE channels
- Word of mouth
Accessibility
Ensure your event is accessible:
- Wheelchair-accessible venue
- Dietary options for catering
- Live captioning or sign language (if budget allows)
- Quiet space for breaks
- Clear signage
After the event
- Send thank-you emails
- Share photos and highlights
- Publish feedback summary
- Document lessons learned for next year
- Maintain connections with attendees
Need help?
Reach out to other CRE organisers or the ACM COMPUTE community for advice and support.